


(The issue of Wifi not showing up on Windows 10 and 11 computers) The problem of Wifi not appearing on Windows 10 and 11 computers: If you're experiencing the issue of your Wifi network not appearing on your Windows 10 device, use the simple solutions provided in this article to easily resolve this problem.
We will explain how to fix the issue of your Wifi network not showing up. Connecting our various electronic devices to a Wi-Fi network for internet access has become routine for us. However, if you can't find your wireless network, there's a chance you won't be able to access it at all.
If you've tried connecting a device to your Wifi network and it hasn't worked, that's a significant issue; however, it is solvable. So, let's take a look at some of the best solutions to fix this error easily.
Simple methods to fix the issue of Wifi not appearing on Windows 10 and 11 computers
Here are the best ways to fix the issue of Wifi not appearing on Windows 10 and 11 computers. Just follow all the solutions provided below in chronological order and stop when your Wifi network becomes visible.
Fix 1: Restart the Router
If the issue occurs on your home Wifi network, you can also check the Wifi network itself to see if the problem lies with the router or the SSID broadcasting.
The most likely cause of the Wifi network not appearing is an issue with your Internet Service Provider (ISP). Restarting the router will allow you to reconnect to your ISP.
Fix 2: Disable the Firewall on Windows.
The Windows Firewall can also interfere with Wifi network performance, leading to the network not appearing. You should check the Windows Firewall to see if it is the cause of the problem.
To test this, temporarily disable the Windows Firewall:
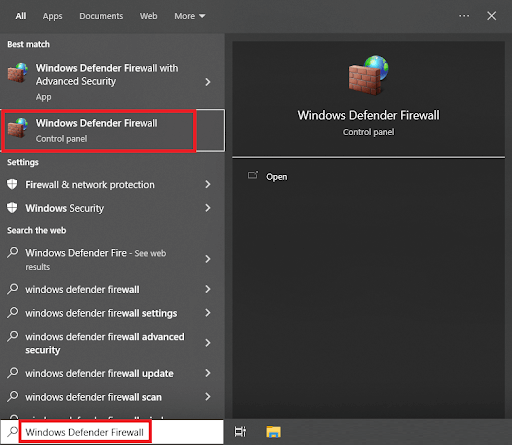
1- After typing "Firewall" in the search box, go to the Start menu and select "Windows Defender Firewall" from the list of available programs.
2- Choose either "Turn Windows Defender Firewall on or off" from the list on the left side of the Windows Defender Firewall program.
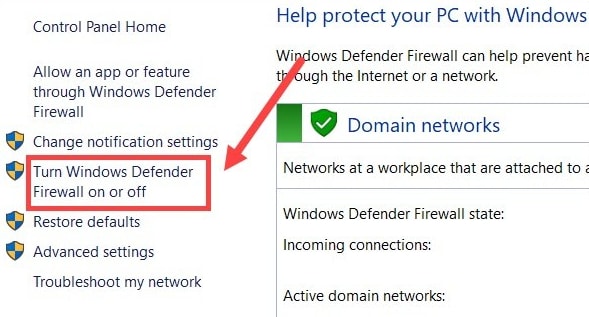
Turn Windows Defender Firewall on or off
3- A window will appear allowing you to adjust the level of protection. Check the box next to "Turn off Windows Defender Firewall," located at the bottom of each section.
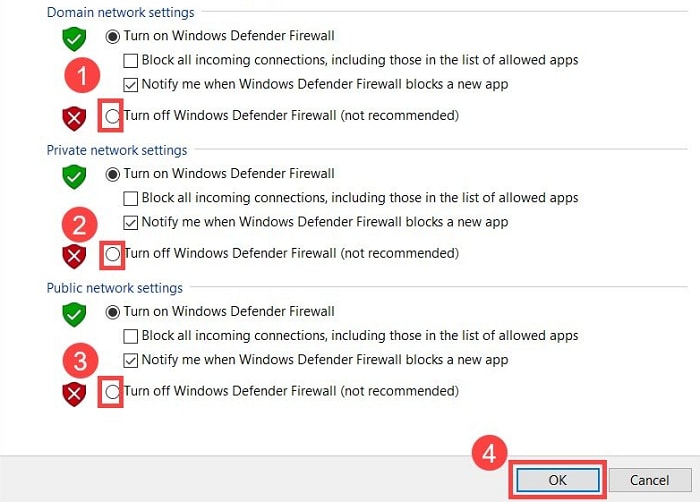
Turn off Windows Defender Firewall
4- After selecting "OK," you will need to restart your computer.
Once the system restarts, it's important to check again if Windows 10 can successfully locate the Wifi network.
Check now if the Wifi network is available. If not, proceed to the next solution to fix the issue.
Fix 3: Update the Network Adapter Driver
One of the most common reasons for the Wifi network not appearing in Windows 10 is an outdated driver.
Therefore, the most accurate solution for such a problem is to update the driver to its latest version. To accomplish this task, you can use Win Riser, which is the best driver update software for Windows 10 that allows you to update any type of outdated drivers, including the network driver. Additionally, the tool offers other features to enhance system performance as well.
Let's see how you can update the network driver and fix the Wifi network not appearing issue in Windows 10.
- Download the Win Riser tool using the download button provided below.
- Install the program and then run it to start a deep scan of your system automatically.
- When the scan results appear, use the Fix Issues Now button to eliminate all errors.
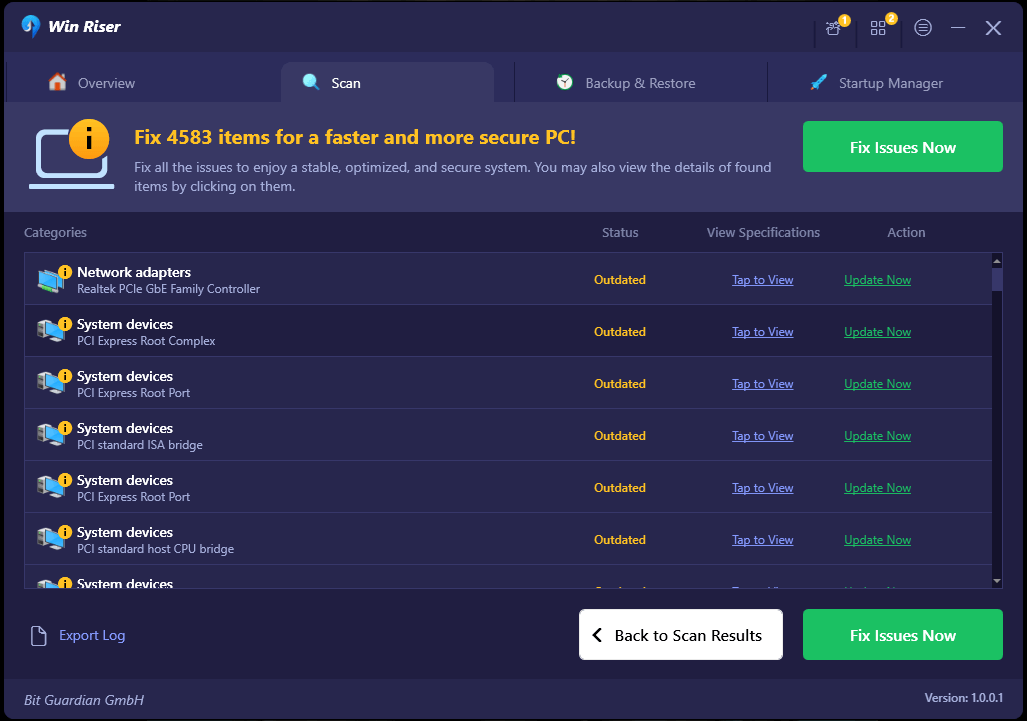
Update Win Riser for all outdated drivers, and click on Fixes Now
- Alternatively, you can also click on the driver category and update drivers for a quick fix to the error, but using the previous method is the best.
- Restart the system when prompted.
This solution is a magic fix for the Wifi network not working and many other errors. If this solution fails, follow the next solution to fix the Wifi not appearing error.
Fix 4: Change Channel Settings on the Router
Another way to fix the issue of the Wifi network not appearing in Windows 10 is to change the router settings. There are some advanced changes you can make to the router to easily resolve this issue. Just follow the steps below closely to fix this problem:
Open a web browser and enter the IP address in the browser's address bar.
A warning screen may appear on your browser at this time.
To proceed, choose Advanced Options > Continue from the dropdown menu.
Please provide your email address and password. If you can't remember your login details, they should be written on the back panel of the router somewhere.
After that, go to "Wireless Settings." The name and position of this option may vary depending on the router you are using.
In most cases, you will need to start by going to the advanced settings menu.
Make sure to select the frequency band for which you want to change the channel (either 2.4 GHz or 5 GHz). There may also be an auto-connect feature that should be turned off.
Use the dropdown menu labeled "Channels" to select a new channel for your Wifi connection.
Fix 5: Reload IP Address Settings.
It is conceivable that the issue of your Windows 10 computer not recognizing your Wifi network is not related to the process of finding the network itself, but rather to the actual connection process to the network.
This may occur if your computer's IP address is incompatible with another device's address on the network.
Therefore, you need to reload the IP address settings to fix the issue of the Wifi network not appearing in Windows 10. Follow the steps below to learn more:
1- Go to the search bar, type Command Prompt, and then press Run as Administrator there.
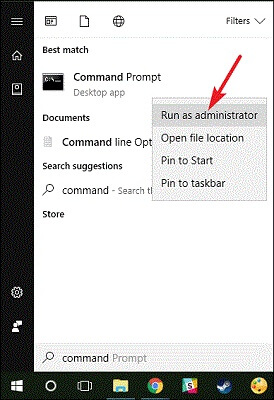
Run Command Prompt as Administrator
2- In the Command Prompt window, type the following commands followed by the Enter key.
ipconfig /release
ipconfig /renew
A box will display a new IPv4 address once this command is executed. If this solution does not work, you can try the next solution to fix the Wifi not appearing error.
Fix 6: Restart TCP/IP Protocol.
Let's take a look at the next fix for the Wifi not showing up in Windows 11.
If possible, manually reset all TCP/IP connections. You may be able to resolve any network connection issues by doing so, including those problems that prevent the network card from detecting accessible networks.
Go to the search bar, type Command Prompt, and then press Run as Administrator there.
Run Command Prompt as Administrator
In the box that appears for the Command Prompt, type the following command lines, then press Enter after each line.
netsh int ip reset
netsh int tcp set heuristics disabled
netsh int tcp set global autotuninglevel=disabled
netsh int tcp set global rss=enabled
This method will allow you to fix the Wifi not appearing error by resetting the IP. If this solution does not work, you can try the next solution to make it easier for you.
Fix 7: Disable IPv6 Protocol
If you have enabled the IPv6 protocol on your device, you may encounter difficulties when trying to connect to other networks or the internet.
Disabling this protocol is often the solution to issues such as the Wifi network not appearing in Windows 10. Follow the steps below to fix this issue:
- Right-click on the network option on the taskbar and click on Open Network and Internet Settings.
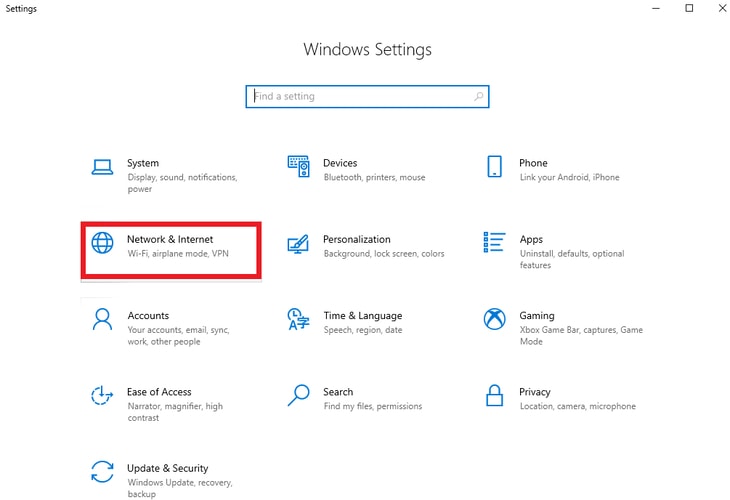
Network and Internet
- Click on the "Change Adapter Properties" button. In the Network and Sharing option, click on Change Adapter Settings.
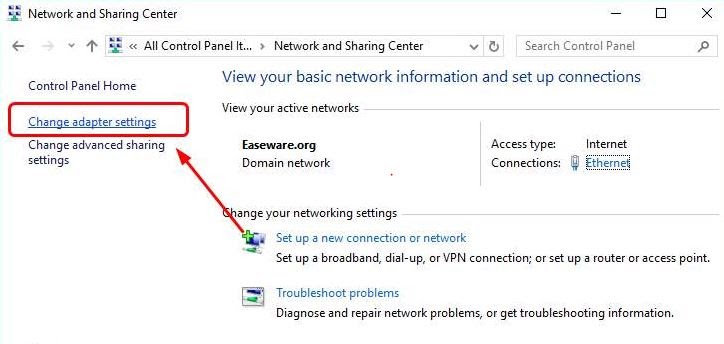
- Right-click on the available network connection and open properties.
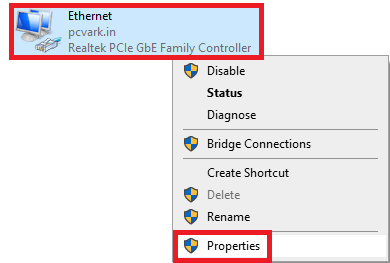
- Look for "Internet Protocol Version 6 (TCP/IPv6)" in the list of connection components.
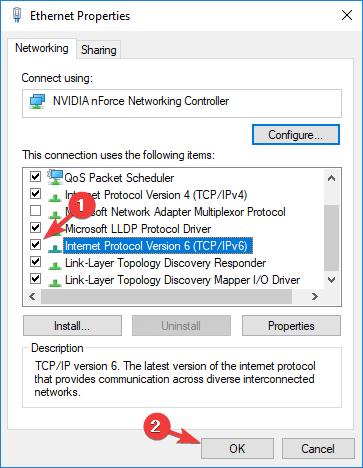
- Uncheck the box next to this item to turn off IPv6 protocol.
- Please select OK.
- After restarting your computer, you should check again to see if the Wifi network is displayed in the list of available networks.
This is how disabling the IPv6 protocol can help you fix the Wifi network not appearing error on your laptop.
Fix 8: Get Help from Windows Troubleshooter
Another great way to fix the Wifi not appearing issue in Windows 10 is to use the Windows Troubleshooter. This tool is very useful and allows your system to search for the source of the error and fix it easily.
Follow the steps below to resolve this issue:
1. Press the Win + I keys together to bring up the Windows settings.
2. From the window displaying the settings, select the Update & Security option, then click on Updates & Security.
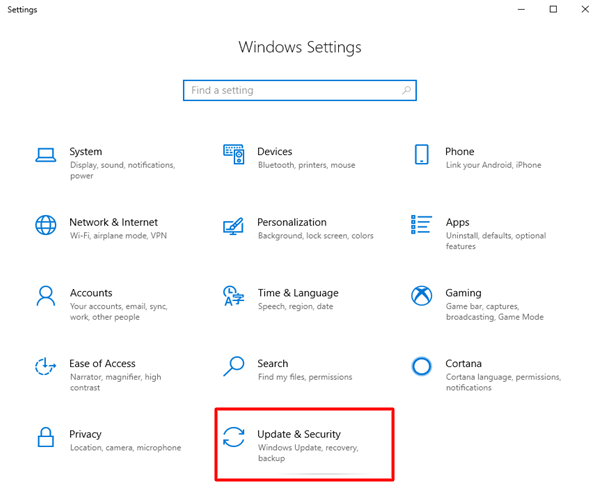
3. Select Troubleshoot from the list on the left, then select Additional Troubleshooters from the list that appears in the right window.
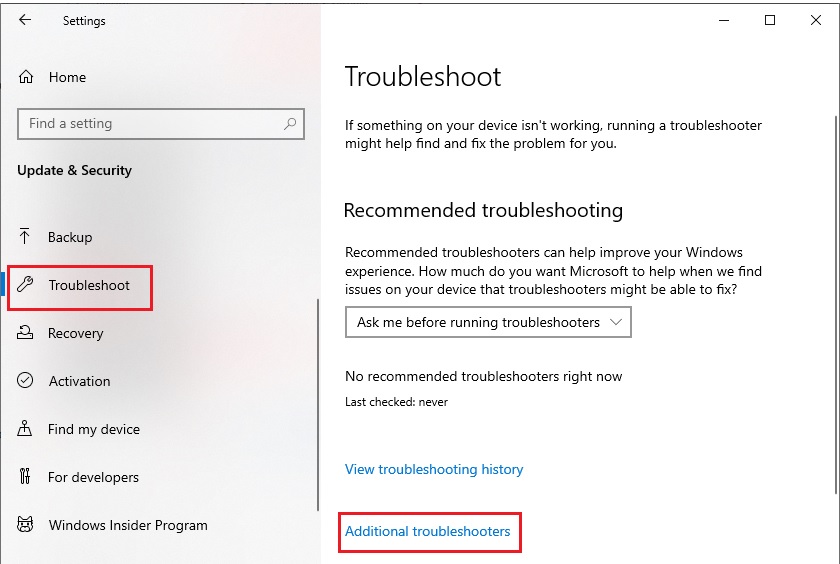
Additional Troubleshooters
4. Choose Network Adapter from the dropdown list of potential issues at the bottom of the page.
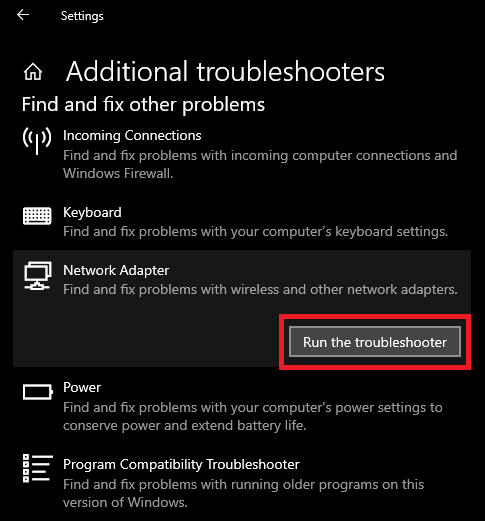
From the dropdown list that appears, select the "Run the Troubleshooter" option. Run the Network Adapter Troubleshooter
5. Start the troubleshooting process.
6. The Troubleshooter will guide you to the cause of the issues you are facing with your network.
7. If the Troubleshooter is successful, your computer will need to restart.
This is a simple solution that allows you to fix all network-related issues as diagnosed by the operating system. After following the above steps, you will be able to easily find the desired Wifi connection.
Conclusion
That's all we had to share with you. We hope that after implementing all the solutions, you will no longer face the issue of the Wifi network not appearing on Windows 10 and 11 computers. Once you follow all the solutions, you should be able to see the desired Wifi network in the list. If you want to help us further, please reach out using the comments section below.
You might also like
<a href="https://3almalt9nia.com/%d8%a7%d8%b5%d9%84%d8%a7%d8


