


How to fix memory management error: Encountering a BSOD (Blue Screen of Death) error is one of the most frustrating experiences for Windows users.
The memory management error, with the code 0x0000001a, falls into this category and occurs when your operating system encounters a critical issue.
This error prevents you from logging into your computer and continuously leads you to a blue screen displaying the message "Memory Management Error 0x0000001a".
So, why does the above error occur suddenly?
You might already have a good idea of what could be causing this error.
To pinpoint the issue, just think about the recent changes you made to your computer. Answer the following questions, and you may discover the reason behind these blue screen errors:
Have you recently installed new hardware, software, games, or drivers?
Have you recently updated your operating system?
Did you attempt to upgrade your operating system?
Have you downloaded and installed anything from an untrustworthy source?
Have you experienced any improper shutdowns of your computer, etc.?
If any of the above actions align with your recent activities, reversing these changes may likely resolve the issue effortlessly.
How to fix memory management error 0x0000001a on Windows 11 and 10?
Resolving the aforementioned error is not a daunting task, especially if you have a basic understanding of operating system installation and troubleshooting.
Our goal here is to simplify the process with clear step-by-step instructions.
Solution 1: Increase Disk Space
The memory management error 0x0000001a, as its name suggests, indicates a problem with memory management.
If you suspect that disk space is low on your system, consider increasing the available disk space or expanding the size of your Windows drive.
You can achieve this using tools like EaseUS Partition Master. However, before making any changes, ensure that there is enough disk space available.
Expanding Disk Space - Step by Step
Step 1: Create a bootable EaseUS Partition Master USB.
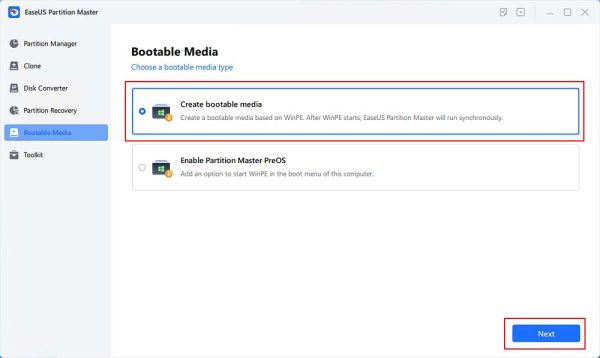
EaseUS-bootable-disk-1
Step 2: Restart your computer and access the BIOS or UEFI settings. The process varies by computer, but it usually involves pressing the "Delete," "F2," "F10," or "ESC" keys during startup.
Step 3: Locate the "Boot" or "Boot Order" section in the BIOS/UEFI menu.
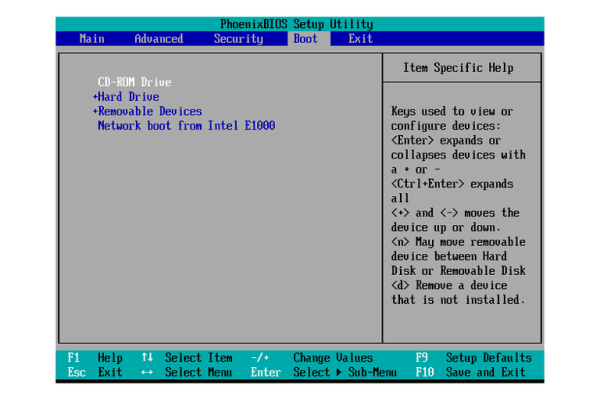
2_bios_boot_option
Step 4: Select the EaseUS Partition Master boot device.
Step 5: Save the changes and exit the BIOS/UEFI settings. Your computer will attempt to boot from the selected device.
Step 6: Select the partition you want to increase the space for.
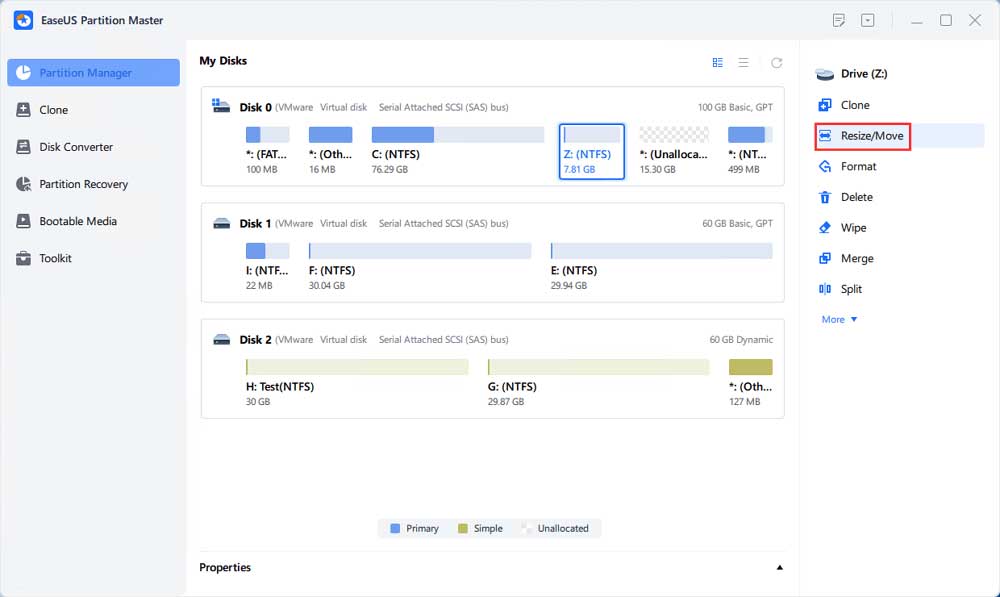
Step 7: Expand the partition from another drive.
Solution 2: Remove Viruses and Malware from Windows Using Kaspersky Rescue Disk
Kaspersky Rescue Disk is not only free but also works intelligently. This is essential because often, serious viruses and malware cannot be effectively removed while the operating system is running.
Kaspersky Rescue Disk creates its own isolated environment, allowing it to safely and efficiently eliminate these malware threats.
Kaspersky Rescue Disk - Step by Step
Step 1: Download Kaspersky Rescue Disk from the official Kaspersky website or using the following link:
https://www.kaspersky.com/downloads/free-rescue-disk
Step 2: Create a bootable USB/DVD using Rufus/Win32 Disk Imager.
Step 3: Boot your computer using the bootable USB drive.
Step 4: First, update the antivirus database.
Step 5: Run a system scan and follow the instructions displayed on your computer screen.
Solution 3: Replace Faulty RAM/SSD
It is impossible to overlook hardware failures when troubleshooting computer issues.
Having faulty RAM or SSD can significantly contribute to the memory management error 0x0000001a.
The reliable troubleshooting method involves testing by replacing these components - RAM and SSD.
This allows for a comprehensive analysis to determine if the error persists after replacement.
Solution 4: Uninstall Recent Windows Updates.
If you suspect that the above error started occurring after a recent Windows update, consider removing these updates and performing a clean boot to resolve the issue.
You can reinstall the latest Windows updates using the following steps.
Uninstalling Updates - Step by Step
Step 1: Open the Advanced Startup Options or Windows Recovery Environment. Click on Troubleshoot.
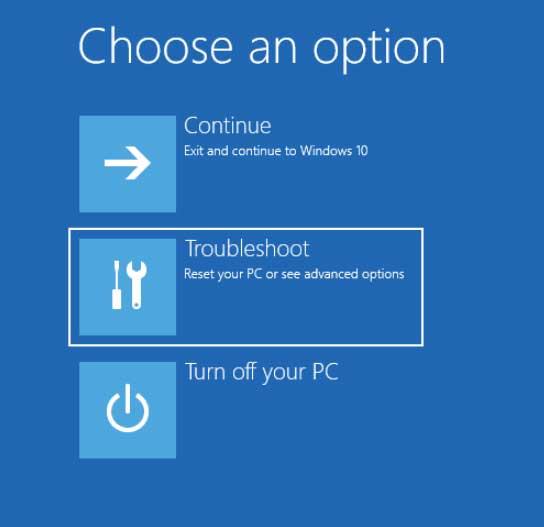
Troubleshoot in the Advanced Startup Menu for Windows 10 and 11
Step 2: Go to Troubleshoot ➜ Advanced options ➜ Uninstall Updates.
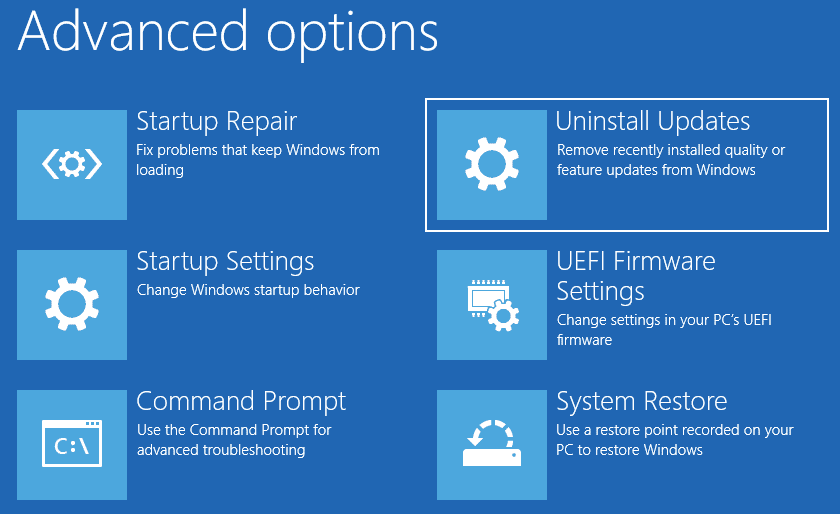
Win Uninstall Advanced Options
Step 3: Select Uninstall the last quality update.
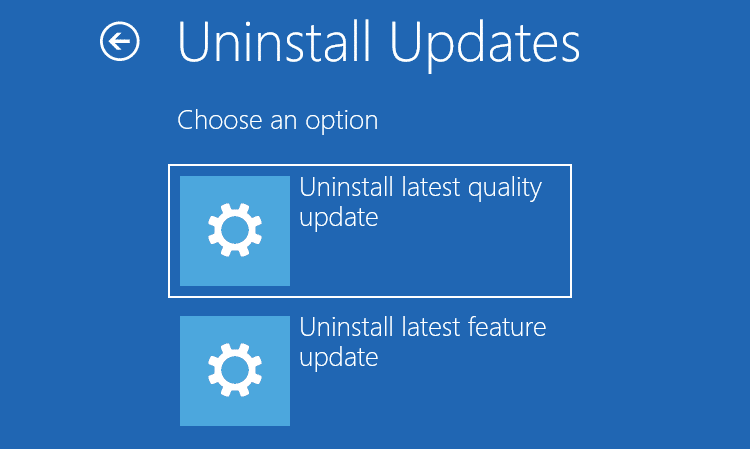
Win-Uninstall-Updates
Step 4: Click the Uninstall Quality Update button and remove the updates.
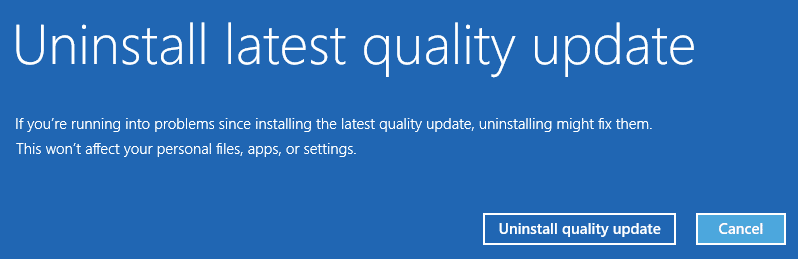
Win-Uninstall-Quality-Update
Solution 5: Run SFC, DISM, and CHKDSK in Windows Repair Environment.
SFC/Chkdsk/Dism - Step by Step
Step 1: Open Command Prompt as Administrator.
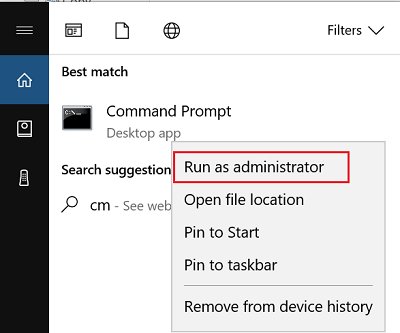
Open Command Prompt as Administrator in <a href="https://3almalt9nia.com/%d8%aa%d8%ad%d9%85%d9%8a%d9%84-%d8%aa%d8%ac%d9%85%d9%8a%d8%b9%d8%a9-%d8%إصدار%d8%a7%d8%a1%d8%a7%d8%a9%d8%a7%d8%a9%d8%a7%d8%a9%d8%a7%d8%a9%d8%a7%d8%a9%d8%a7%d8%a9%d8%a7%d8%aة%d8%a7%d8%aة%d8%a7%d8%aة%d8%a7%d8%aة%d8%a7%d8%aة%d8%a7%d8%aة%d8%a7%d8%aة%d8%a7%d8%aة%d8%a7%d8%aة%d8%a7%d8%aة%d8%a7%d8%aة%d8%a7%d8%aة%d8%a7%d8%aة%d8%a7%d8%aة%d8%a7%d8%aة%d8%a7%d8%aة%d8%a7%d8%aة%d8%a7%d8%aة%d8%a7%d8%aة%d8%a7%d8%aة%d8%a7%d8%aة%d8%a7%d8%aة%d8%a7%d8%aة%d8%a7%d8%aة%d8%aا%d8%aة%d8%aا%d8%aة%d8%aا%d8%aة%d8%aا%d8%aة%d8%aا%d8%aة%d8%aا%d8%aة%d8%aا%d8%aة%d8%aا%d8%aة%d8%aا%d8%aة%d8%aا%d8%aة%d8%aا%d8%aة%d8%aا%d8%aة%d8%aا%d8%aة%d8%aا%d8%aة%d8%aا%d8%aة%d8%aا%d8%aة%d8%aا%d8%aة%d8%aا%d8%aة%d8%aا%d8%aة%d8%aا%d8%aة%d8%aا%d8%aة%d8%aا%d8%aة%d8%aا%d8%aة%d8%aا%d8%aة%d8%aا%d8%aة%d8%aا%d8%aة%d8%aا%d8%aة%d8%aا%d8%aة%d8%aا%d8%aة%d8%aا%d8%aة%d8%aا%d8%aة%d8%aا%d8%aة%d8%aا%d8%aة%d8%aا%d8%aة%d8%aا%d8%aة%d8%aا%d8%aة%d8%aا%d8%aة%d8%aا%d8%aة%d8%aا%d8%aة%d8%aا%d8%


