

How to clean up unwanted files in Windows 11 and 10: Over time, your computer may slow down due to the accumulation of unwanted files. These temporary files are linked to applications, cache memory, cookies, leftover program files, and more.
Fortunately, there are various ways to clean up these unnecessary files and free up space. The time and effort required will depend on the method you choose to clear unwanted files.
Identifying and deleting unnecessary files will help improve your PC's performance. It will also assist in updating device drivers, cleaning up spyware and adware, and removing malware, viruses, duplicate files, browsing history, disk optimization, identifying large files, safely deleting files, recovering them, managing startup items, uninstalling unwanted files, and much more.
By the end of this article, we are confident that you will be able to clean your computer and enhance its performance for a faster experience.
Common Types of Unwanted Files
Temporary files - These files are created by applications and the system. Although they are usually deleted automatically upon each restart, sometimes they are not. You should manually search for and clean them to declutter your computer.
Temporary Internet files - These files are created by the browser to speed up the loading time of web pages and are known as temporary Internet files.
Application leftovers - When a program is uninstalled, some corresponding files are left behind. These files are useless and should be deleted to keep the computer clean.
Recycle Bin files - deleted files that remain in the Recycle Bin, giving you a chance to recover deleted data.
Thumbnails - These files help load previews of images and videos quickly. Deleting them may take a little longer to load images and videos.
Windows Upgrade log files - During Windows updates, Windows creates logs of the activities performed. These files assist in troubleshooting, but you can delete them if Windows is functioning well after the upgrade.
Benefits of Cleaning Up Unwanted Files
Freeing up space - Unwanted files, as the name suggests, are files that the PC no longer uses. However, they take up unnecessary space. If your available space is low or your computer is slow, you should consider cleaning up unwanted files in Windows 11 and 10.
Improving system performance - A cluttered computer filled with unmanageable data puts an extra burden on processing and system resources. Deleting unwanted files helps manage data, speeds up downloads, scans for viruses, and enhances system speed.
- Unwanted files can be a safe haven for malware to hide, meaning you should get rid of them as soon as possible before hackers can exploit these unwanted files.
How to Get Rid of Unwanted System Files on Your PC?
There are several ways to delete unwanted files from your computer. Here, we will explain the best methods to clear temporary files from Windows 11 and 10.
Method 1 - Empty the Recycle Bin
One of the most common yet overlooked methods for cleaning up unwanted files is emptying the Recycle Bin. Every file you delete from your computer is moved to the Recycle Bin and remains there until it is emptied. To clean it, follow these steps:
On the Windows desktop, look for the Recycle Bin.
Double-click it to open.
Before you empty the Recycle Bin, check all the files because once emptied, you won't be able to manually recover the files. To recover them, you will need to use a data recovery program.
Select the files and folders you want to delete and press the delete button.
Confirm the action, and that's it.
Tip: If you don't mind losing your only chance to recover accidentally deleted files and don't want to move files to the Recycle Bin, use Shift + Delete to remove files and folders. This will save you from accumulating unwanted data.
Method 2 - Use the Cleanup Feature
In addition to emptying the Recycle Bin, if you are a Windows 11 user, you can clean up unwanted files using the cleanup recommendations. To do this, follow these steps:
Press Windows + I to open Windows Settings.
Click on System > Storage > Cleanup recommendations.

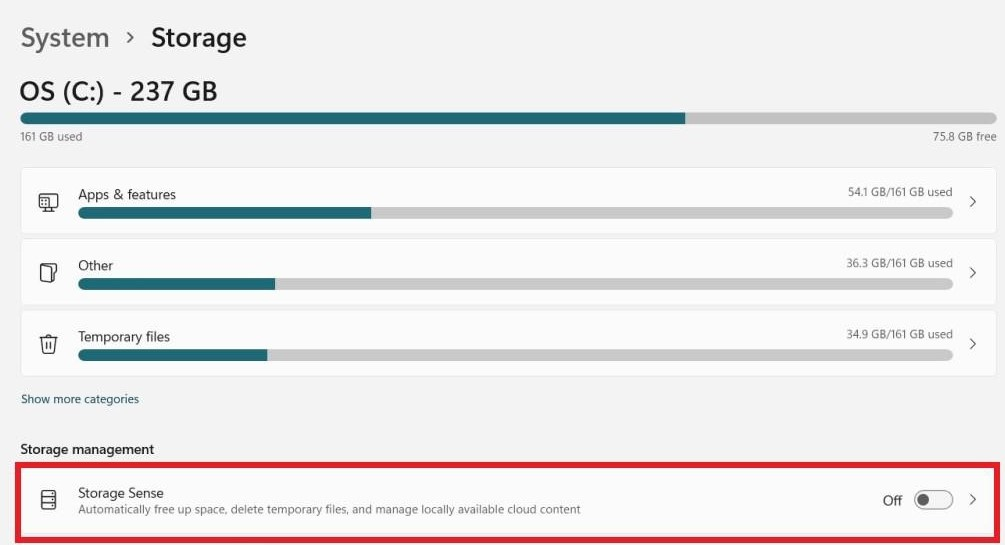
Storage Management
Let the scan run and display the temporary, large, and unused files that you can clean up to free up storage space.
Select them and click on Clean up.
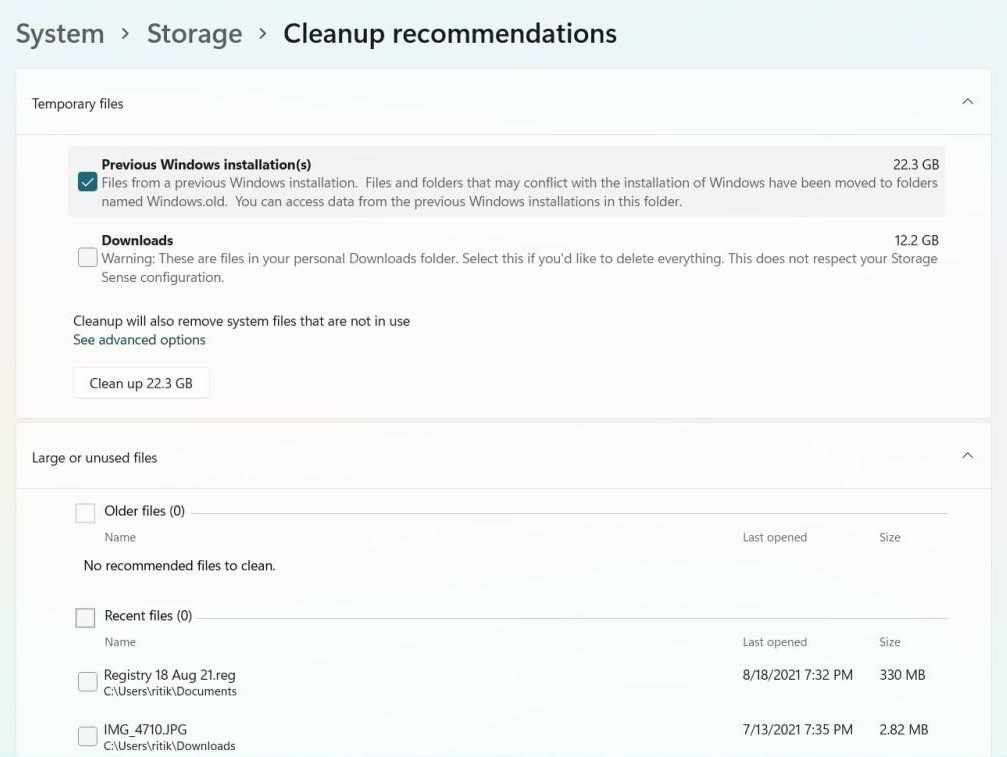
System Cleanup
This will help you deal with temporary files. Additionally, you can see how much space applications, features, and other programs are taking up.
You can also configure "Storage Sense" by clicking on the "Storage Sense" option.
This will keep Windows running smoothly.
Storage Sense is a built-in feature in Windows 10 and Windows 11 that helps you automatically clean up temporary files, system cache, and other unnecessary data to free up disk space. Here’s how to use it:
Enable and configure Storage Sense
Open Settings:
Press Win + I to open Settings.
Go to System > Storage.
Enable Storage Sense:
Under Storage Management, toggle Storage Sense to On.
Customize cleanup settings:
Click on Configure Storage Sense or Run it now.
Choose how often you want Storage Sense to run (daily, weekly, monthly, or only when disk space is low).
Set preferences for deleting temporary files, Recycle Bin contents, and files in the Downloads folder.
Run Storage Sense manually
Go to Settings > System > Storage.
Click on Configure Storage Sense or Run it now.
Scroll down and click on Run Storage Sense now.
Using Cleanup Recommendations (Windows 11 only)
For Windows 11, there is an additional feature to identify files that can be removed:
Open Settings > System > Storage.
Click on Cleanup Recommendations.
Review the files you want to delete, select them, and then click on Clean up.
Method 3 - Run Disk Cleanup
To clean up unnecessary data, unwanted files, and temporary files, all versions of Windows come with a built-in Disk Cleanup tool. With it, you can get rid of cache, temporary Internet files, and thumbnails.
In the Windows search bar, type Disk Cleanup > select and open it.
Select the


