


An Effective Solution to Speed Up Windows Booting - 10, 7, XP, 8.1, and Vista
Are you asking yourself any of the following questions?
Disable startup programs in Windows 7
Disable startup programs in Windows XP
Disable startup programs in Windows 7
Add startup programs in Windows 10
Disable background programs in Windows 10
How to add a program to start with Windows 10
How to run a program at startup
Disable programs at startup in Windows
If so, this article provides a great answer and solution for you, so let's move on to the steps and methods to achieve this :)
Preventing unnecessary programs from running at Windows startup is a great way to speed up your computer. Once you identify the programs that launch when Windows starts, you can choose which ones to remove from startup. All programs use system resources - RAM - so any program you prevent from starting reduces memory usage and can lead to a faster computer.
To prevent a program from starting with Windows.
There are five places where you can stop programs from automatically loading during Windows startup. These are:
1: Startup folder under Start Menu
2: In the program itself under Tools, Preferences, or Options
3: System Configuration Utility
4: System Registry
5: Task Scheduler
1: Check the Startup Folder and Remove Unwanted Shortcuts
•• First, the method used in Windows 10, 8.1, and Vista ••
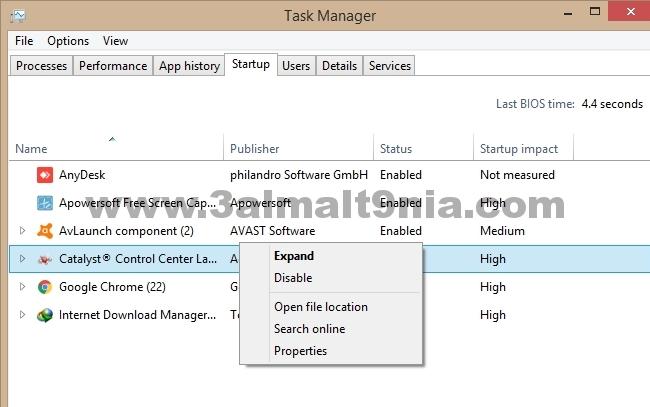
1: Right-click on the taskbar at the bottom of the screen and select (Task Manager)
2: A list will appear; choose (Startup) from the top
3: In this list, you will see the programs that automatically run when the computer starts
4: You can click on any of these programs that you do not want to launch with Windows
5: Right-click and choose Disable
•• Second, the method used in Windows 7 and Windows XP ••
Remove items from the Startup folder.
The first and easiest place to check is the Startup folder under the 'Start' menu.
This folder contains shortcuts for programs designated to run at Windows startup. To remove a program's shortcut from this folder:
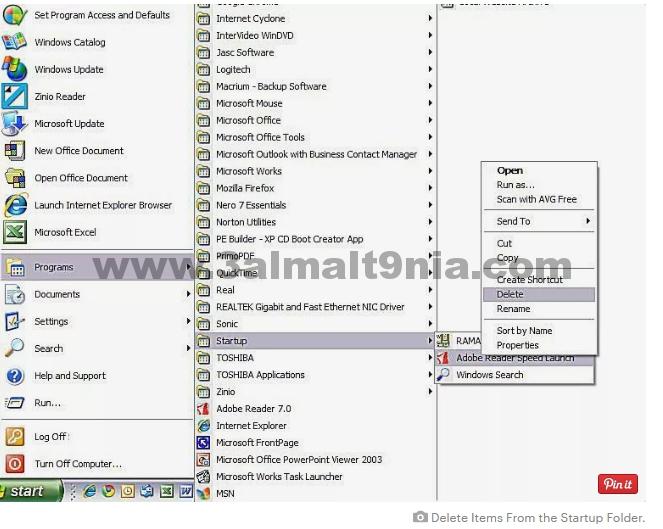
1: Navigate to the Startup folder. (See the image above)
2: Right-click on the program you believe does not need to load at startup.
3: Select Cut to temporarily place the shortcut in the clipboard.
4: Right-click on the desktop and select 'Paste' to place the shortcut on the desktop.
5: Restart your computer after removing the shortcuts from the Startup folder to ensure everything works as you want.
If everything works correctly after the restart, delete the shortcuts from the desktop or drop them in the 'Recycle Bin'. If it doesn't work after the restart, copy the shortcut back into the Startup folder. Restart again to ensure everything functions as expected.
Note: Deleting the shortcut does not remove the program from your computer.
2: Check Programs and Remove Auto-Start Options

Uncheck the auto-start option.
Sometimes, there is an option in the program itself to load when Windows starts. To find these programs, look in the toolbar on the right side of the taskbar. The icons you see are some of the programs currently running on your computer.
To prevent a program from starting when Windows boots, open the program and look for the 'Options' menu. This menu is usually under the Tools menu at the top of the program window, but it may also be under Preferences. Once you find the 'Options' menu, look for a checkbox that says 'Run this program at Windows startup' or something similar. Uncheck this box and close the program. The program should not run at Windows startup again.
3: Use the System Configuration Utility

Use the System Configuration Utility.
Using the System Configuration Utility (MSCONFIG), instead of the 'System Registry' (in the next section), is safer and provides the same results. You can uncheck items in this utility without deleting them to prevent them from running at Windows startup. If there is an issue, you can re-enable them later to fix it.
How to Run the System Configuration Utility
1: Click on the Start menu, then click on Run or use the search bar in Windows 10 and other versions and type Run
or use the Windows key next to the Alt key on your keyboard, hold it down, and then press the R key.
2: Type msconfig in the text box and then click 'OK' to open the 'System Configuration Utility'.
3: Click on the Startup tab to see the list of items that load automatically with Windows.
4: Uncheck the box next to the name of the program you do not want to start with Windows.
5: Close this program and restart your computer.
Note: If you are unsure about an item, resize the 'Startup Item', 'Command', and 'Location' columns to see all the information. You can check the folder indicated in the Location column to identify the item, or you can search online for more information. Generally, programs listed in Windows or system folders should be allowed to load - leave them alone.
After unchecking one item, restart your computer to ensure everything works correctly before unchecking others. When Windows reboots, you may see a message indicating that Windows is starting in selective or diagnostic mode. If this appears, check the box to prevent this message from showing in the future.
4: Use the System Registry (REGEDIT)

Use the System Registry.
If you used MSCONFIG and unchecked a program you do not want to start with Windows in the previous section, you do not need to follow the 'System Registry' instructions in this section. It is optional and not recommended for most Windows users.
If you are an advanced Windows user and feel lucky, you can open the System Registry.
Warning: Proceed with caution. If you make a mistake in the 'System Registry', you may not be able to undo it.
How to Use the System Registry:
1: Click on the Start menu, then click on Run as we did in the previous section.
2: Type regedit in the text box.
3: Click OK.
Navigate to
HKEY_LOCAL_MACHINE > Software > Microsoft > Windows > CurrentVersion > Run folder ⇒⇒
4: Right-click on the desired item to select it, then press Delete, and confirm the action.
5: Close the System Registry and restart your computer.
Do not delete anything if you do not know what it is. You can uncheck items using MSCONFIG as described in the previous section without deleting them and re-enable them if it causes an issue, so you won't have to go to the 'System Registry' where you cannot undo the deletion.
5: Remove Unwanted Items from Task Scheduler
Remove Items From Task Scheduler.

To prevent unwanted programs from automatically starting when Windows boots, you can remove tasks from the Task Scheduler in Windows.
To navigate to the folder C: \\ windows \\ tasks: follow these steps
1: Click on the Start menu, then click on My Computer.
2: Under Hard Drives, click on 'Local Disk' (C:).
3: Double-click the Windows folder.
4: Double-click the Tasks folder.
This folder contains a list of tasks scheduled to run automatically. Drag and drop unwanted task shortcuts to the desktop or another folder. You can delete them later if you wish. The tasks you remove from this folder will not run automatically in the future unless you set them up to do so again.


