

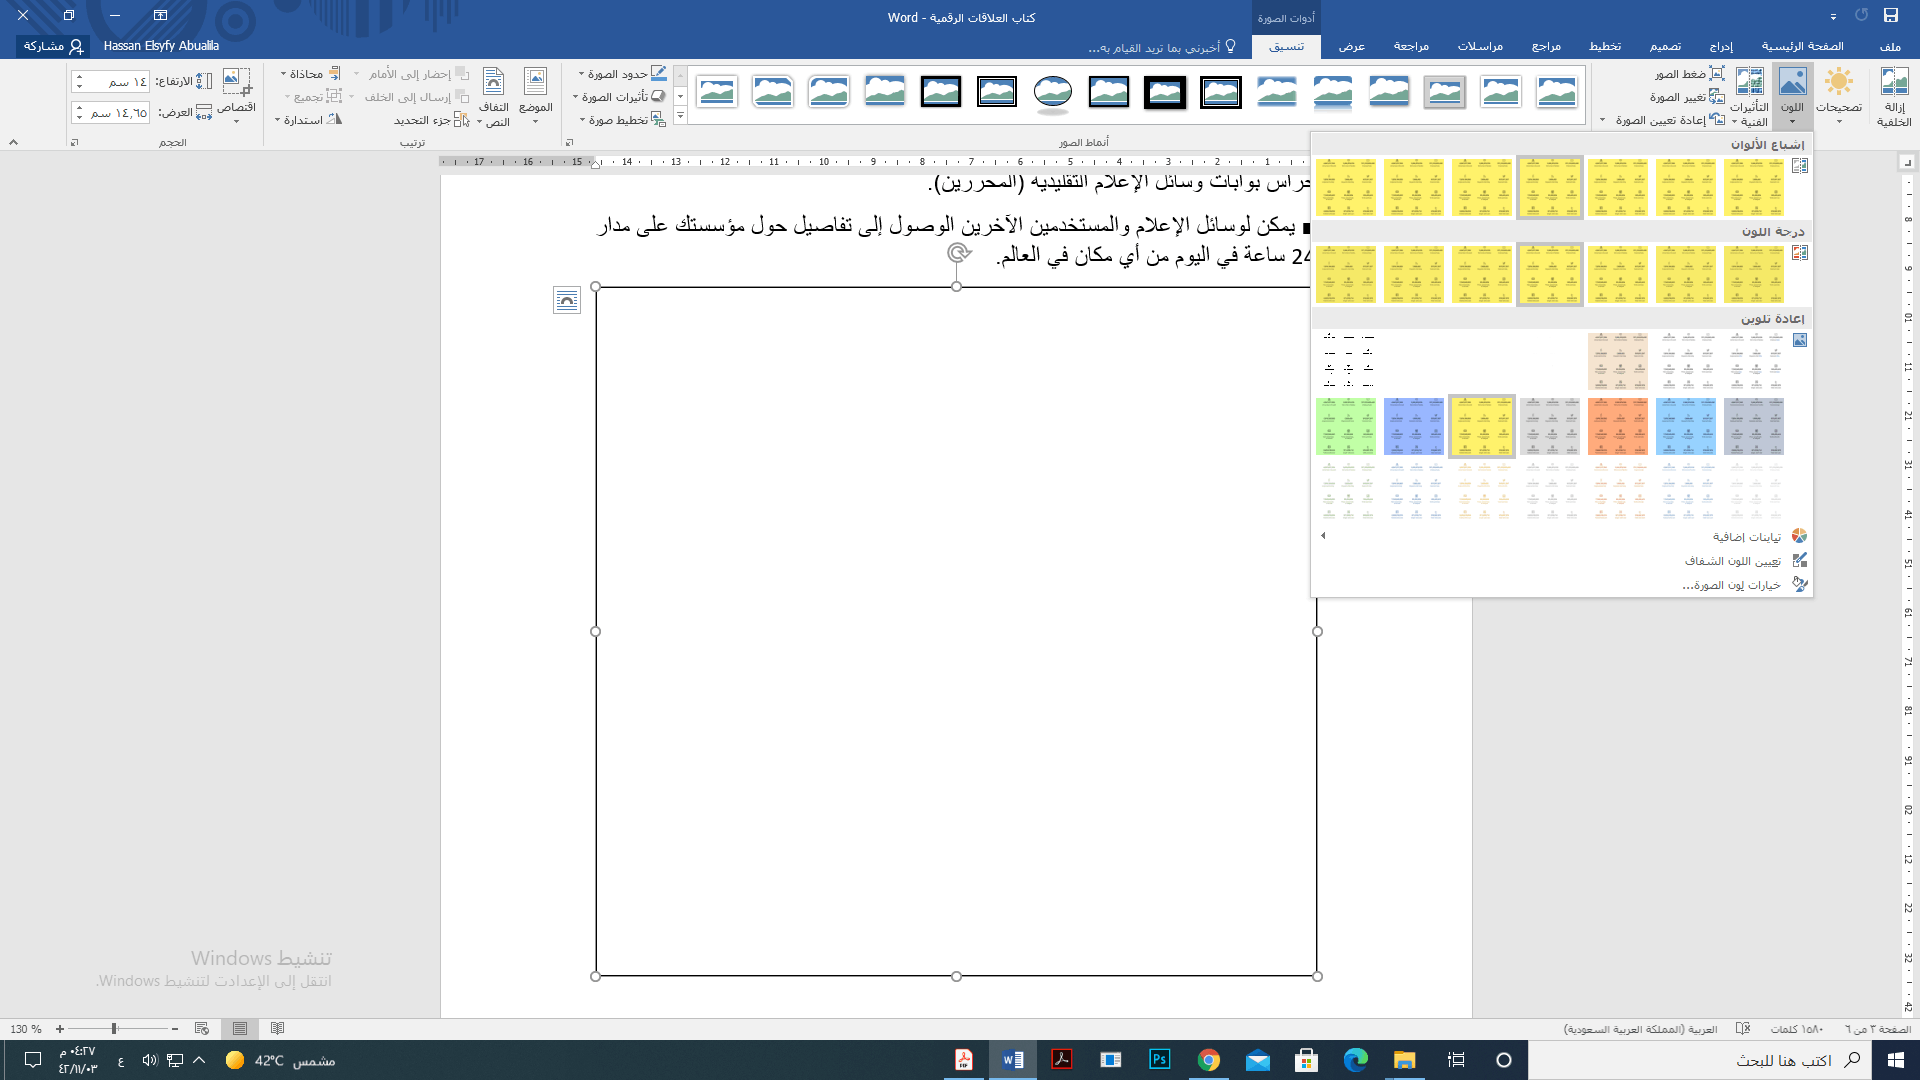
Fixing the issue of images not appearing in Word: Imagine reading a Word document without any images; it’s more than just boring. You might struggle to get through to the last word, as there are no pictures to pique your interest. Consequently, your document may fail to serve its purpose if Word doesn’t display the images even after you’ve added them.
However, you’re not the only user facing this frustrating issue; many others have reported the same problem. So, stick with us for this detailed guide on how to quickly and easily resolve the issue of images not appearing in Word.
Let’s start by understanding what might be causing this situation to help you fix it better.
Why doesn’t Word display images?
Here are some possible reasons why Word may not be displaying images correctly.
Issues with inserting the image.
Your graphics driver is outdated.
Word doesn’t support your image format.
Incorrectly configured document settings.
After identifying the reasons for images not appearing in Word, let’s discuss how to correct the situation.
How to fix the issue of images not appearing in Word
You can apply the following solutions if images have disappeared from your Word document or if Word is not displaying images correctly.
Fix 1: Ensure your document is compatible
Before trying any complex solutions, you should check whether the images in your document and the version of Word on your computer are compatible with each other.
If the images are not displaying correctly despite being fully compatible with the Word application, you can proceed to troubleshoot further.
Fix 2: Enable the option to show graphics and text boxes on the screen
Word may fail to display images correctly if you haven’t allowed it to show text boxes and graphics. Therefore, you can follow these steps to enable the option to show graphics and text boxes to resolve the issue.
First, launch the Microsoft Word application on your computer.
Next, select File from the top left corner of the Word menu.
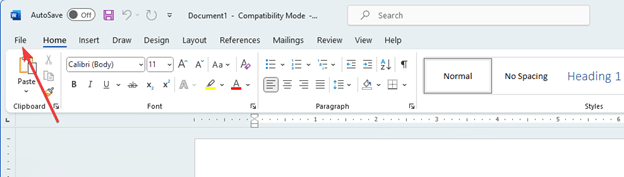
MS Word select file
Now, choose "Options" from the bottom left corner of the File menu.

MS Word select file then option
Go to the Advanced tab in the Word Options menu.
You can now check the box to show graphics and text boxes on the screen.
Finally, click "OK" to complete the above process.
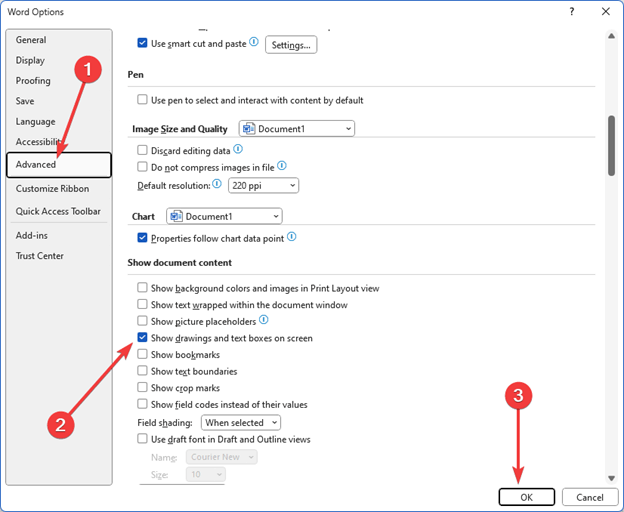
MS Word select file then option then advanced
Fix 3: Change the wrapping style to "In Line with Text"
MS Word may not display images the way you want because the wrapping style is not set to "In Line with Text." Therefore, changing the wrapping style to the correct setting can resolve the issue.
You can follow the instructions below to do this.
First, click on the image you inserted in the document.
Second, right-click on the selected image.
Now, select Wrap Text from the available options in the menu that appears on the screen.
Finally, choose In Line with Text from the available options to change the image wrapping style.
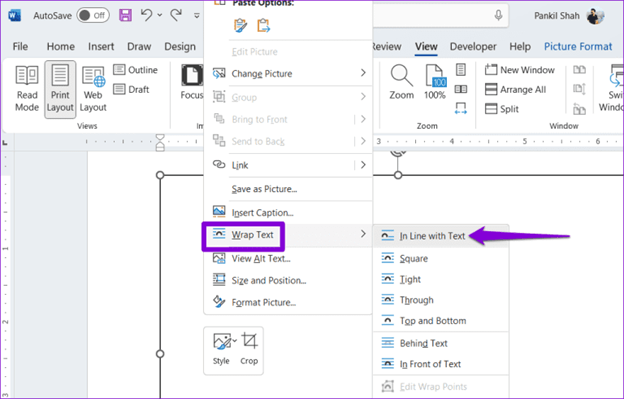
In line with text - text wrapping
Fix 4: Change your document view type
Viewing the document in Draft or Outline view might be the reason why MS Word cannot load graphics or images. Therefore, you can take the following steps to change the document view type to resolve the issue.
First, open your Word document.
Next, select View from the top menu.
Now, you can choose either Web Layout or Print Layout.
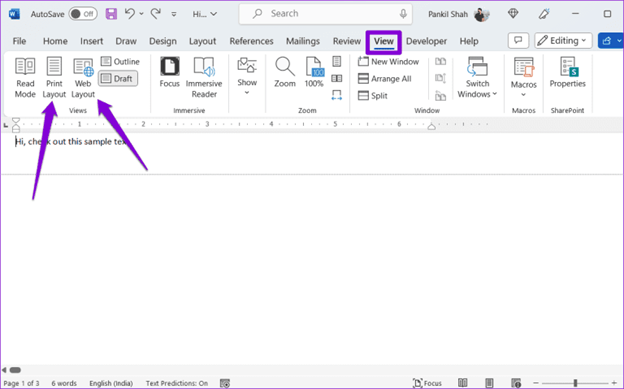
Select MS Word view then print layout or web layout.
Fix 5: Try disabling Draft Quality
The Draft Quality option can prevent Word from displaying images when opening documents in normal format. Therefore, you can follow the instructions below to disable the Draft Quality option to resolve the issue.
First, launch the MS Word application on your computer.
Next, select File from the top left corner of the Word menu.
Now, choose Options from the bottom left corner of the File window.
You can now go to the Advanced tab.
Navigate to the Printing section.
Now, uncheck the box for Use Draft Quality.
Finally, click the OK button.
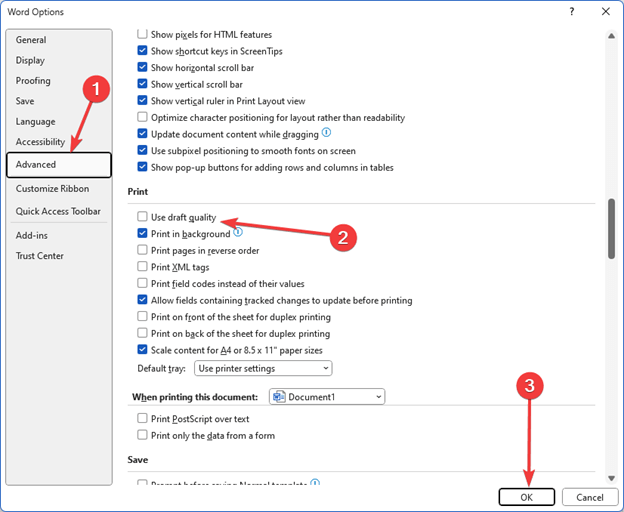
Try disabling Draft Quality
Fix 6: Update your graphics driver (recommended)
An outdated graphics driver is responsible not only for MS Word not displaying images but also for many other issues, such as system performance degradation. Therefore, updating drivers is among the highly recommended solutions for most problems you may encounter.
You can update drivers effortlessly using an automated program like Win Riser, which updates all drivers with a single click and enhances computer performance through features like removing unwanted files, detecting malware, backing up and restoring drivers, and more. You can click the following link to get this program.
After downloading the program package from the link above, install Win Riser on your computer (the installation takes just a few seconds).
Once the program is installed, you can follow the steps below to update outdated drivers.
First, allow Win Riser to scan your computer for a few seconds.
Second, review the scan results to see which drivers need updating.
Click the "Fix Issues Now" button to resolve all issues instantly.
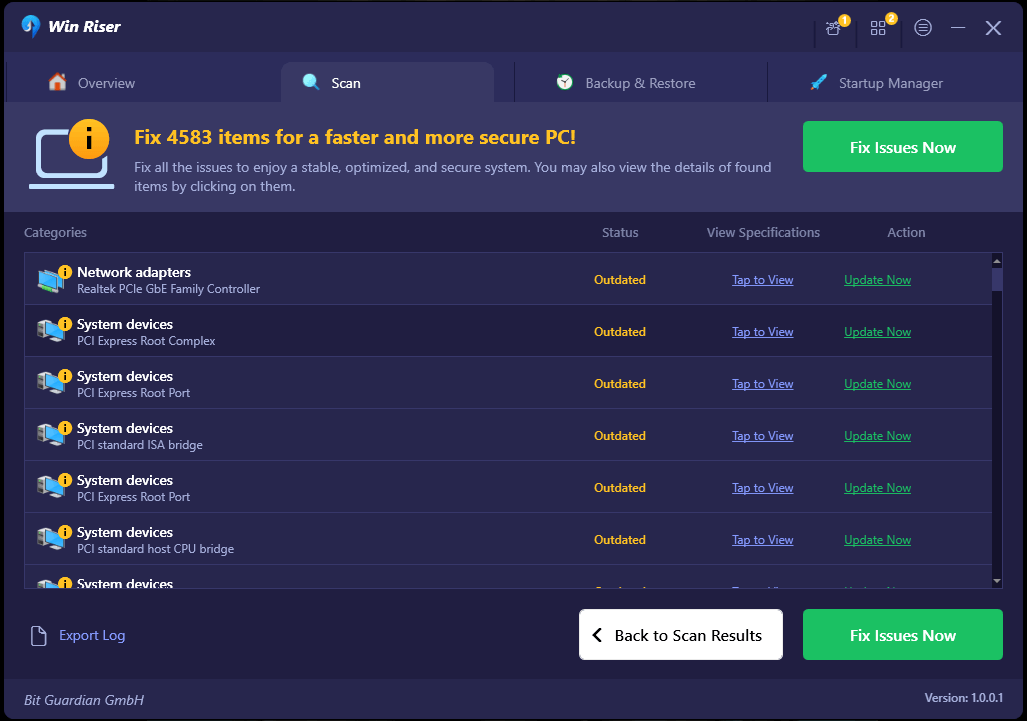
Update Win Riser for all outdated drivers, click Fixes Now
Finally, restart your computer to complete the driver update process.
Please note that the Win Riser driver update program allows you to update individual drivers if you do not intend to update all outdated drivers.
However, updating all drivers is beneficial for you as it elevates your computer's performance to new heights.
Fix 7: Try disabling picture placeholders
Picture placeholders prevent images from displaying if you have a low-spec computer. Therefore, you can disable the picture placeholders option to resolve the issue by following the steps below.
First, select "File" from the top left corner of the Microsoft Word window.
Second, choose "Options" from the bottom left corner of the File window.
Now, select Advanced Options from the right panel of the available options.
You can now uncheck the option to show picture placeholders.
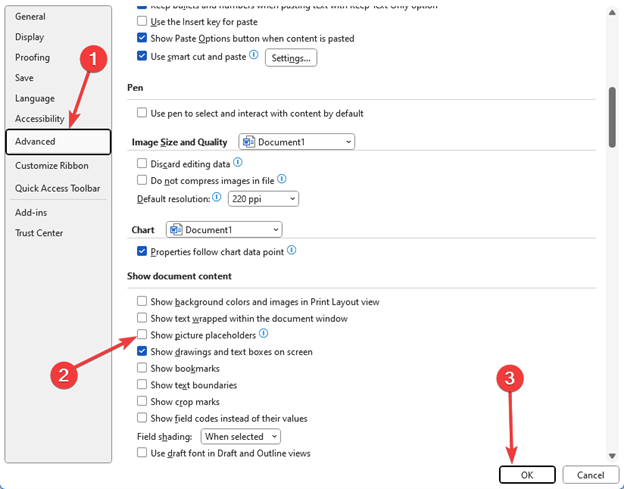
Try disabling picture placeholders
Finally, click the "OK" button to complete the process of disabling picture placeholders.
Fix 8: Try repairing Office
If none of the above solutions helped resolve your issue, you can use the Office Repair tool to fix the corrupted Microsoft Word application.
Here are the steps to do that.
First, access the Run utility using the Windows+R keyboard shortcut.
Second, enter appwiz.cpl in the Run box that appears on the screen and click the "OK" button.
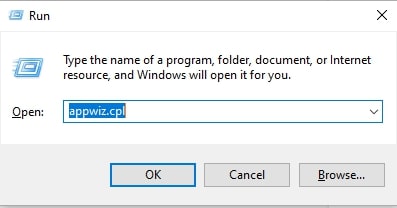
Appwiz.cpl
Now, look for the Microsoft Office suite and select it from the list of applications.
After selecting the Microsoft Office suite, choose "Change" from the top menu.
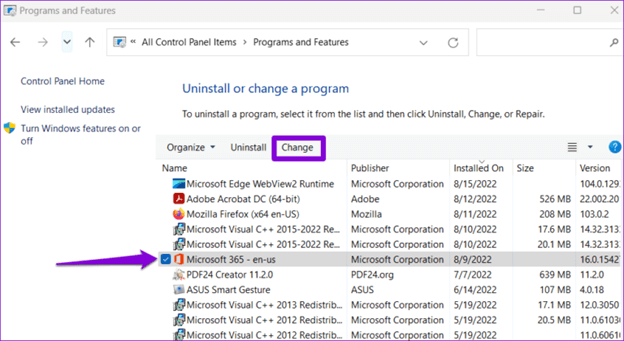
Try repairing Office
Finally, select Quick Repair from the available options, click the Repair button, and let the process complete.
Conclusion
This article guides you through ways to fix the issue of images not appearing in Word. You can start troubleshooting the problem with the first fix, and if it doesn’t resolve the issue, you can continue down the list of solutions until the problem disappears.
However, if you’re short on time and need a quick fix for almost all issues, we recommend updating your drivers using Win Riser. If you have any questions or suggestions regarding this article, feel free to leave a comment to get in touch with us.
You might also like
Download NXPowerLite Full to Compress Word and PDF Files
Download the Corrupted Word File Repair Program – Remo Repair Word 2.0.0.31 with Activation
How to Remove Watermark from Word File for Free
<a href="https://3almalt9nia.com/%d8%a3%d9%81%d8%b6%d9%84-%d8%a8%d8%b1%d9%86%d8%a7%d9%85%d8%ac-%d9%84%d8%aa%d8%ad%d9%88%d9%84-%d9%85%d9%84%d9%81%d8%a7%d8%aa-word-%d8%a5%d9%84%d9%89-pdf-%d9%84%d9%84%d


