

How to Remove the Windows Activation Watermark: The "Activate Windows" watermark can be quite frustrating when you're busy with important tasks, distracting you and potentially appearing awkward in screen recordings. This watermark indicates that your Windows license key is invalid or has expired. On the bright side, you can remove the "Activate Windows" watermark without any hassle.
Wondering how? Then keep reading, as this article will introduce you to various methods to remove this watermark from your computer screen. Let's get started on removing the watermark without wasting any more time.
How to Remove the Windows Activation Watermark
Here are the methods you can use to get rid of the "Activate Windows" watermark on your computer.
Method 1: Use a Product Key to Activate Windows
Most likely, you received a product key when you purchased a licensed Windows. You can use this key to activate Windows and remove the activation watermark. Here are the steps to do so.
The first step is to open your computer's settings, which you can access using the shortcut key Win+I.
In the second step, you will be prompted to select "Update & Security" from the options available on your screen.
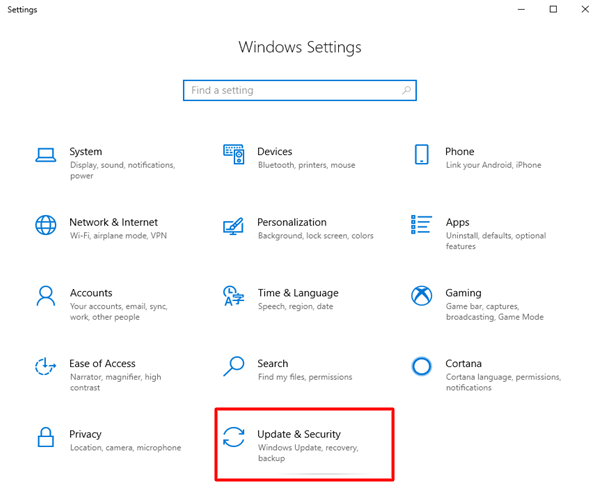
Click on "Update & Security"
Next, you can choose "Activation" from the update and security options.
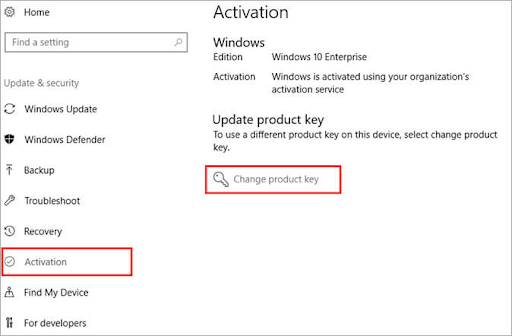
Change Product Key
In this step, select the option to change the product key from the product key update section.
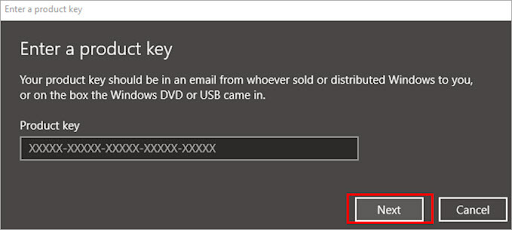
Enter your product key
You can now enter your product key in the box that appears on the screen and click "Next."
After that, look for Windows and install it on the system.
Finally, restart your computer to complete the process.
Method 2: Remove the "Activate Windows" Watermark on Windows 10/11 Using PowerShell
You can use PowerShell scripts to communicate with the Windows operating system to remove the annoying activation watermark. Here are the instructions for using it.
First, activate Windows Search using the keyboard shortcut Win+S.
Second, type "PowerShell" in the search box.
Next, select "Run as Administrator" from the Windows PowerShell menu.
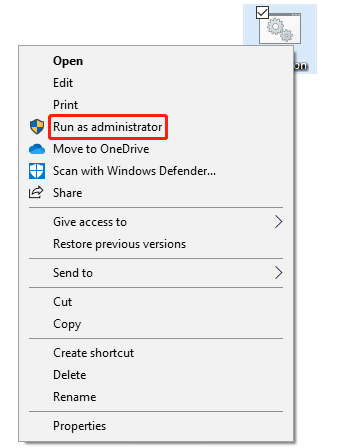
Select "Run as Administrator"
After opening Windows PowerShell as an administrator, type slmgr /renew in the command line and press Enter.
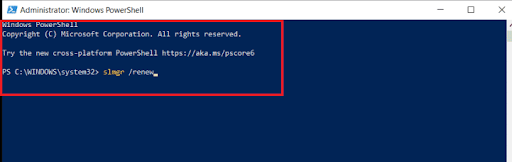
Enter slmgr renew in the command line
Finally, restart your computer to ensure the watermark is removed.
Method 3: Use Accessibility Features to Remove the "Activate Windows" Watermark
The accessibility feature is helpful when you want to make any changes to your Windows system. Moreover, using the accessibility option to disable background images removes the watermark prompting you to activate Windows. Here are the steps to use it.
First, use the shortcut key Win+S to access Windows Search.
Second, type "Control Panel" in the search box on your screen.
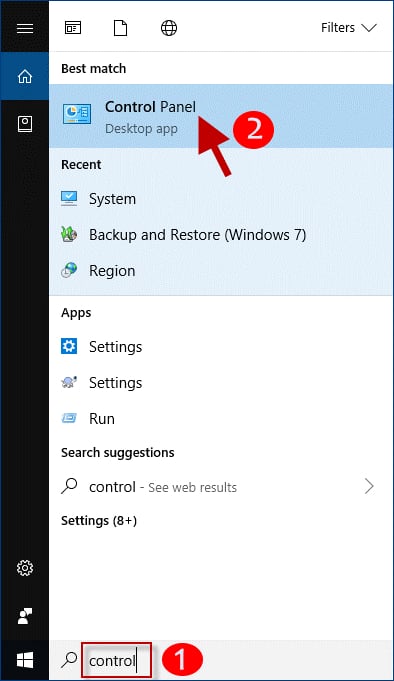
Control Panel
In this step, you need to click on the result that appears under Best Match to open the Control Panel application.
After opening the Control Panel, change the view to "Large Icons" and select "Ease of Access Center" from the list that appears on the screen.
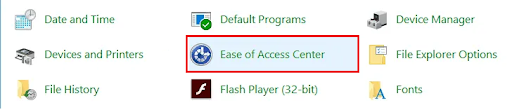
Ease of Access Center
Next, click on the "Make Computer Easier to See" link, which you will find in the Explore all settings section.
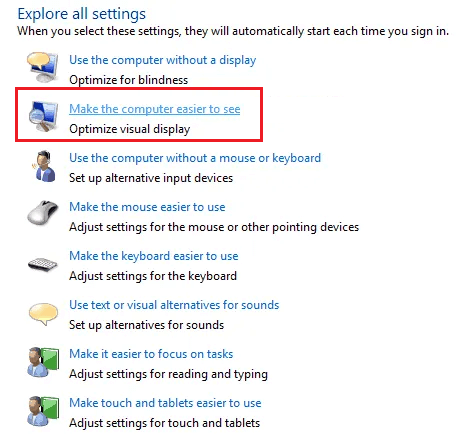
Make Computer Easier to See
In this step, scroll down to find the option to remove background images (wherever available) and check the box next to it.
Finally, click the "Apply" and "OK" buttons to save the changes.
Method 4: Edit the Registry to Remove the Activation Watermark for Windows 10
Making some changes in the registry is another way to remove the watermark. Although we try to make the process as simple as possible for you to follow, please execute the following steps carefully to ensure no harm comes to your computer.
First, activate the Run tool using the shortcut key Win+R.
Second, type "regedit" in the Run box on your screen and click OK to open the Registry Editor.
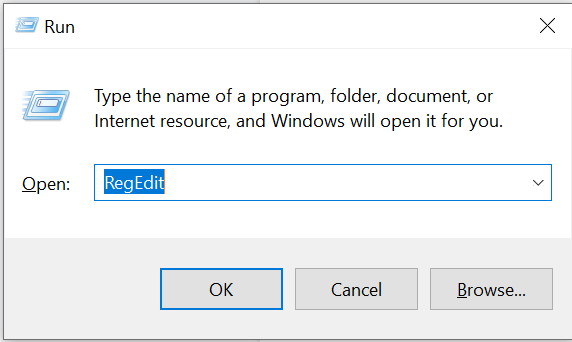
Type the command RegEdi in the Run box and press Enter
After opening the Registry Editor, navigate through the folders in the editor using the arrow icon to reach the path HKEY_CURRENT_USER\Control Panel\Desktop.
In this step, you need to double-click on the value "PaintDesktopVersion"
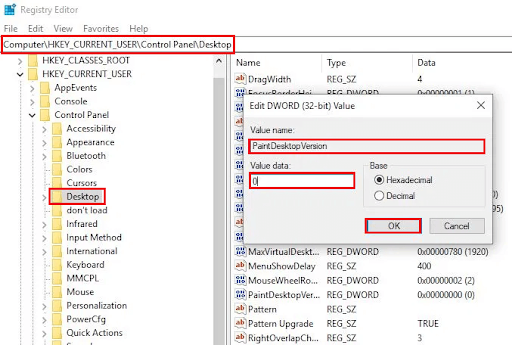
.PaintDesktopVersion
Next, change the value of PaintDesktopVersion from 1 to 0 and click OK to save the changes you made to the registry.
Finally, restart your computer to ensure the watermark is removed.
Method 5: Use Notepad to Remove the Windows Watermark
A simple trick using the Notepad application can remove the "Activate Windows 10 / Windows 11" watermark. Here’s how to perform this procedure.
First, launch Notepad on your computer by searching for it and selecting it from the search results.
After opening Notepad, copy the following code and paste it into the Notepad window.
@echo off
taskkill /F /IM explorer.exe
explorer.exe
exit
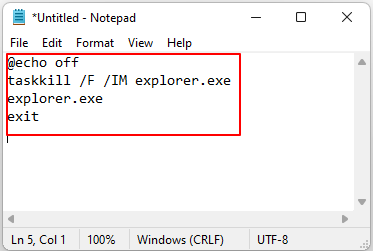
The code in the Notepad window
You can now save this file. Please remember to use the .bat extension when saving this file. For example, you can name this file Activation.bat.
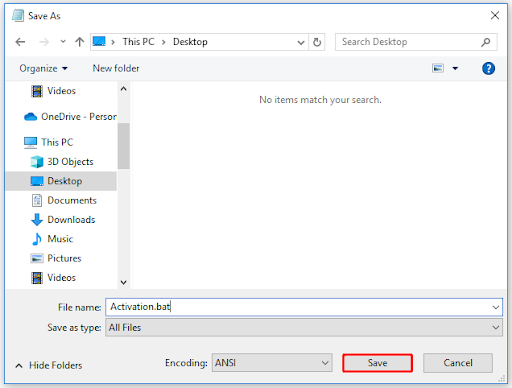
Activation.bat
In this step, right-click on the saved file and select "Run as Administrator" from the available options.
Finally, restart your computer to complete the process.
Method 6: Disable Windows 10 Tips
Windows offers tips and tricks to enhance your experience. Disabling these tips can temporarily remove the "Activate Windows 10" watermark. Here’s how to turn off Windows 10 tips.
The first step is to use the shortcut key Win+I to access Windows Settings.
A settings window will appear on your screen; select "System" from the available options.
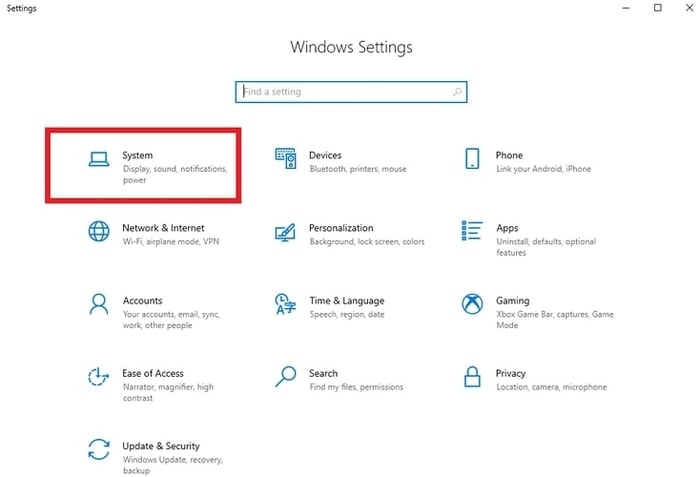
Select - System for troubleshooting
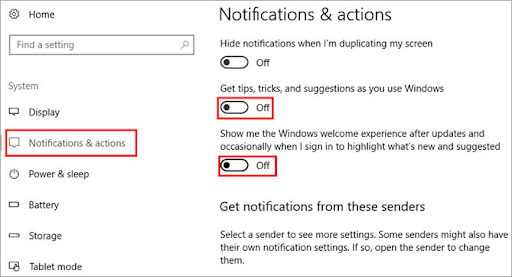
Next, select "Notifications & actions" from the system menu.
You can now turn off the options "Get tips, tricks, and suggestions as you use Windows" and "Show me the Windows welcome experience after updates and occasionally when I sign in to highlight what's new and suggested."
Conclusion
In this article, we discussed how to remove the Windows activation watermark. The "Activate Windows" watermark annoys most users, so this article shared tried-and-true methods to remove it. However, instead of just removing the watermark, you should ensure you are using a licensed and valid version of Windows to avoid various issues.
Frequently Asked Questions
What is the Windows Activation Watermark?
The Windows Activation Watermark is a notification that appears on your desktop when your Windows operating system is not activated. It reminds you to activate Windows to access all its features and remove the restrictions imposed on it.
Why do I need to activate Windows?
Activating Windows ensures that you are using a genuine copy of the operating system, and it gives you access to all features, updates, and support from Microsoft.
How can I remove the Windows Activation Watermark?
The only legitimate way to remove the activation watermark is to activate your copy of Windows. You can do this by purchasing a valid product key from Microsoft or an authorized retailer and then entering it in your system's activation settings.
Can I remove the activation watermark without activating Windows?
It is not advisable to try to remove the activation watermark without activating Windows. Attempting to bypass activation violates Microsoft's terms of service and may lead to legal consequences or restrictions on your system's functionality.
What happens if I don't activate Windows?
If you do not activate Windows, you will continue to see the activation watermark on your desktop, and you will have limited access to certain features and updates. The system may also periodically remind you to activate Windows until you do so.
Windows provides tips and tricks to enhance your experience. Disabling these tips can temporarily remove the "Activate Windows 10" watermark. Here


