


(How to Fix BSOD Error IRQL_NOT_LESS_OR_EQUAL) How to Fix the Blue Screen of Death Error IRQL_NOT_LESS_OR_EQUAL: This is one of the most common and recurring blue screen errors (BSOD) on Windows 11 and 10.
This error occurs when an application or service tries to access a part of memory that it shouldn't access at that specific moment.
Essentially, it indicates that a kernel-mode process or driver made an incorrect or unauthorized attempt to access a memory location at a higher Interrupt Request Level (IRQL).
There are various factors that can cause this error.
Faulty or outdated drivers: In many cases, this error occurs due to incompatible or outdated device drivers, such as graphics card drivers, network drivers, or storage drivers.
Hardware issues: Defective hardware components, especially RAM or hard drives, can lead to this error. Bad RAM can cause memory access issues.
Software conflicts: Software conflicts, particularly those involving security programs or drivers, can also trigger this error.
Overclocking: Overclocking your CPU or RAM beyond their stable limits can lead to instability and result in this error.
Corrupted system files: Corrupted or damaged system files can cause this error. This can sometimes happen due to improper shutdowns or malware infections.
IRQ conflicts: IRQ (Interrupt Request) conflicts can also lead to this error, usually when two devices try to use the same IRQ.
How to Fix the IRQL_NOT_LESS_OR_EQUAL Error on Windows 11?
There is no one-size-fits-all solution for the IRQL_NOT_LESS_OR_EQUAL BSOD error, and resolving it may require trying different methods.
Since the exact cause of this error can be elusive, it's important to keep persevering and try multiple methods to fix it.
If one method doesn't work, don't get discouraged; just move on to the next step until the issue is resolved.
How to Fix the Blue Screen of Death Error IRQL_NOT_LESS_OR_EQUAL
Solution 1: Repair Your Computer in Safe Mode
If you can boot your computer in safe mode, you can perform various Windows repair tasks. Safe mode disables third-party drivers, programs, and services, eliminating the possibility of software conflicts or driver malfunctions.
Once your computer is in "safe mode," you can proceed with the following troubleshooting steps.
Boot Your Computer in Safe Mode
Step 1: Open the Advanced Startup Options.
Step 2: Go to Troubleshoot
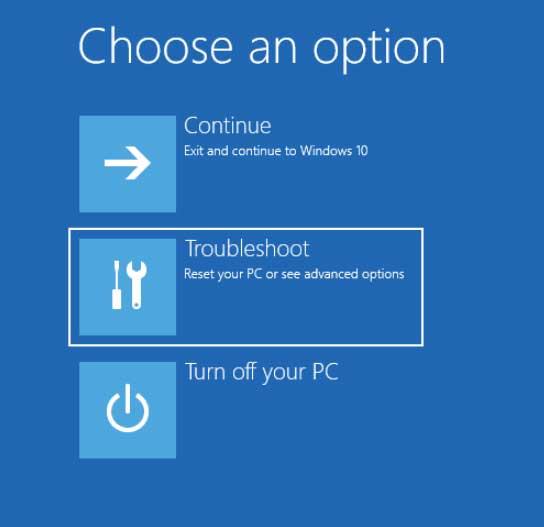
Troubleshoot in the Advanced Startup Menu for Windows 10 and 11
Step 3: Select Advanced Options
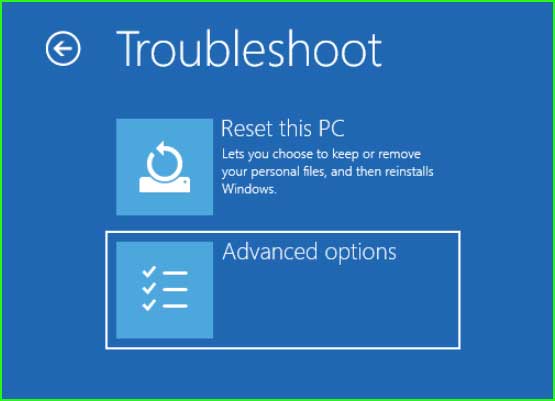
Advanced Options for Windows 10 and 11
Step 4: Select Startup Settings
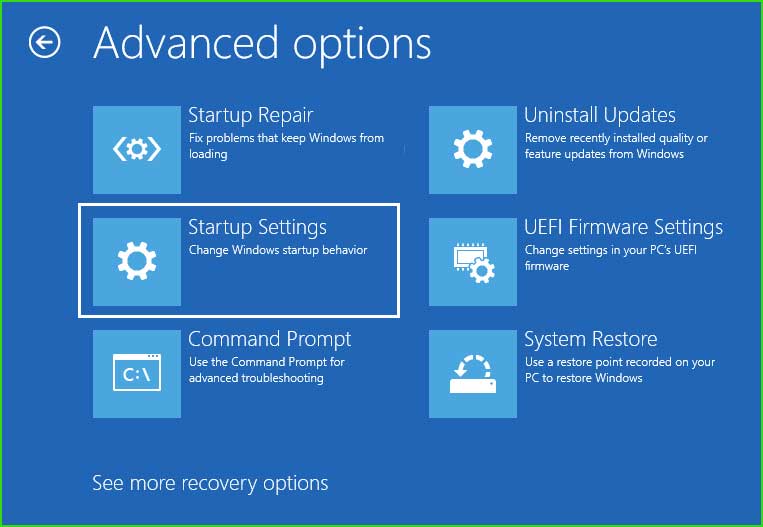 21_Startup Settings
Step 5: Click the Restart button to enable Safe Mode.
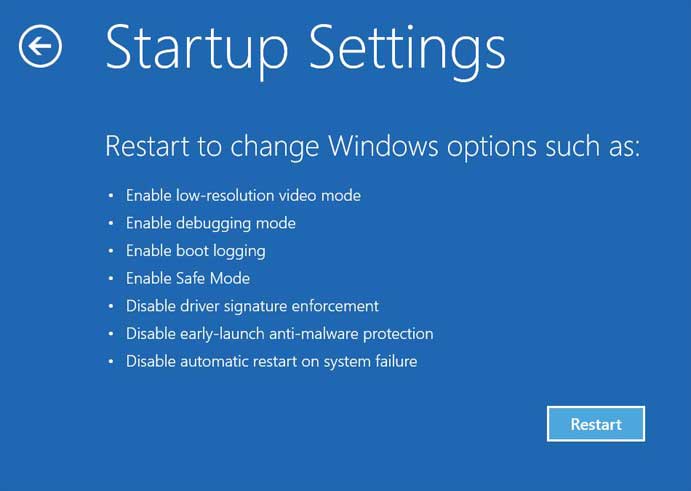
Step 6: Once your computer boots into safe mode, uninstall any recently added games, drivers, and programs.
Run SFC, CHKDSK, and DISM commands.
These three commands are essential for repairing system corruption in Windows. SFC (System File Checker) scans and repairs corrupted files, CHKDSK (Check Disk) identifies and fixes bad sectors on the disk, and DISM (Deployment Imaging Service and Management Tool) is used to repair corruption in Windows system images.
SFC/Chkdsk/Dism - Step by Step
Step 1: Open Command Prompt as Administrator.
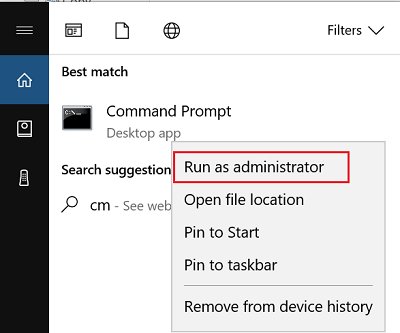
Open Command Prompt as Administrator in Windows 8, 10, and 11
Step 2: Now run the following commands one by one.
1. System File Checker Tool
sfc /scannow
2. Run the Dism command
Dism /Online /Cleanup-Image /CheckHealth
Dism /Online /Cleanup-Image /ScanHealth
Dism /Online /Cleanup-Image /RestoreHealth
3. Run the Check Disk utility.
chkdsk /f c:
You will see the message:
Chkdsk cannot run because the volume is in use by another process. Would you like to schedule this volume to be checked the next time the system restarts? (Yes / No)
Press Y and hit Enter. The disk check will start the next time your computer boots up.
Uninstall recent programs, drivers, and updates.
If you encountered the IRQL_NOT_LESS_OR_EQUAL BSOD after making recent changes to your computer, such as installing programs, drivers, or Windows updates, consider uninstalling those changes as a troubleshooting step.
Update device drivers
Go to Device Manager and check for drivers with a yellow exclamation mark. Right-click on the problematic driver and select "Update Driver."
Solution 2: Remove Malware/Viruses Using Kaspersky Rescue Disk
If you suspect that malware or viruses are causing the Blue Screen of Death, you can use Kaspersky Rescue Disk. This disk includes a bootable tool and does not rely on the operating system to run.
Kaspersky Rescue Disk - Step by Step
Step 1: Download Kaspersky Rescue Disk from the official Kaspersky website or using the following link:
https://www.kaspersky.com/downloads/free-rescue-disk
Step 2: Create a bootable USB/DVD using Rufus/Win32 Disk Imager.
Step 3: Boot your computer using the bootable USB drive.
Step 4: First, update the antivirus database.
Step 5: Run a system scan and follow the instructions displayed on your computer screen.
Solution 3: Run Windows Memory Diagnostic Tool
Defective RAM can be the root cause of the IRQL_NOT_LESS_OR_EQUAL BSOD. To check the integrity of your RAM, run the Memory Diagnostic Tool (mdsched.exe) to perform a memory test. If you find that the RAM is faulty, it is recommended to replace it with a new unit.
Run the Memory Diagnostic Tool
Step 1: Open the Run dialog by pressing Windows + R. Type mdsched.exe and hit Enter.
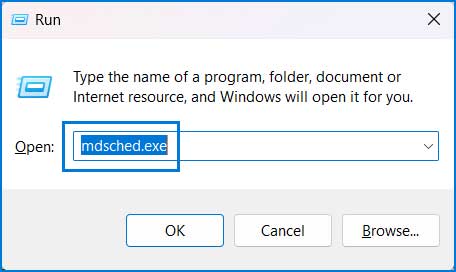
Open the Memory Diagnostic Tool using the Run Window.
Step 2: Click on "Restart now and check for problems (recommended)."
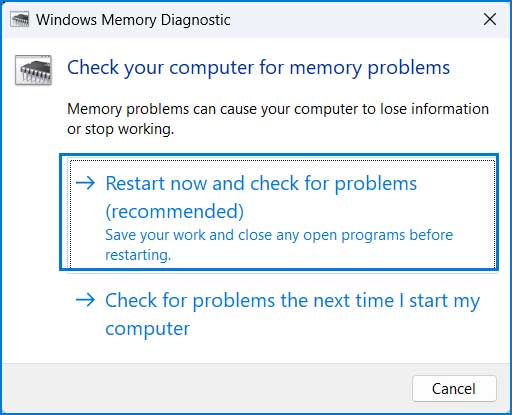
Run the Memory Diagnostic Tool after rebooting.
Step 3: The memory testing process will start upon reboot.
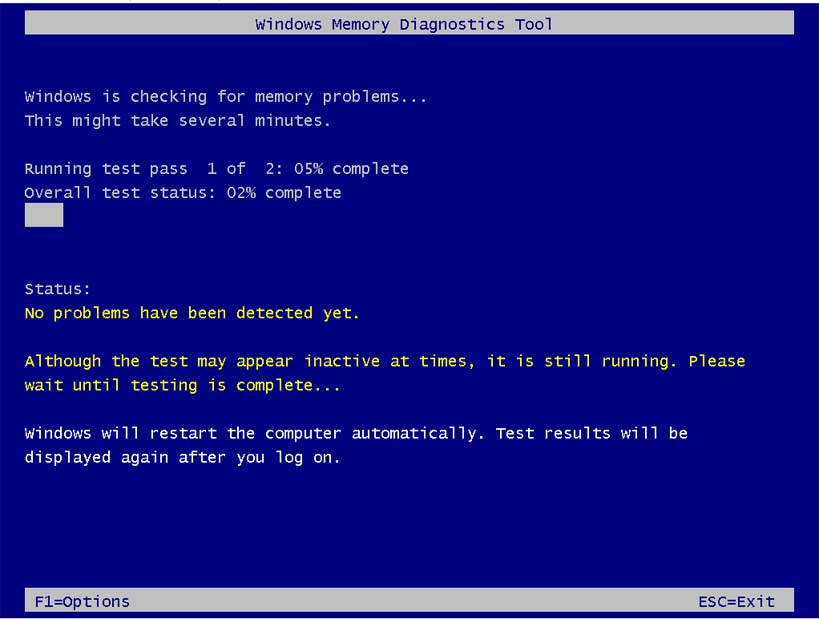
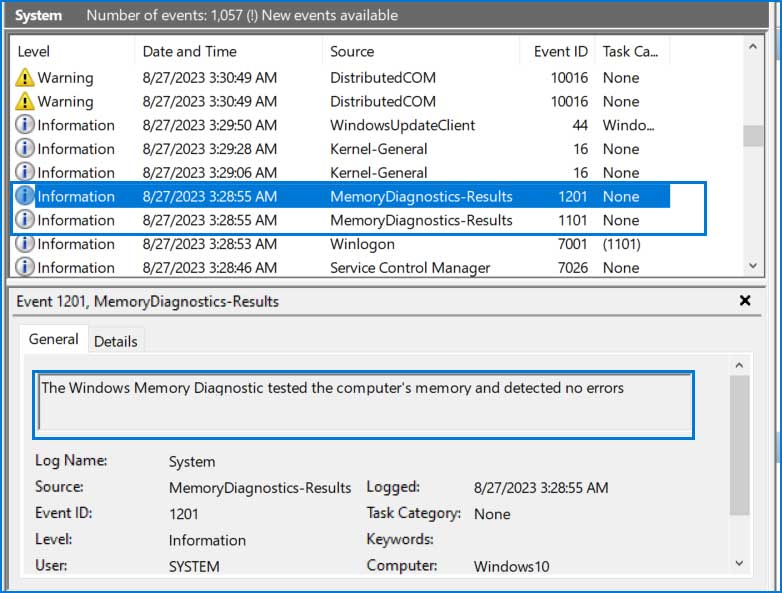
Step 4: The test results will be displayed after you log into your computer. If the results are not displayed, you can view them in the Event Viewer application.
1. Click on the Start menu. Search for Event Viewer and open it.

2. Expand Windows Logs → System.
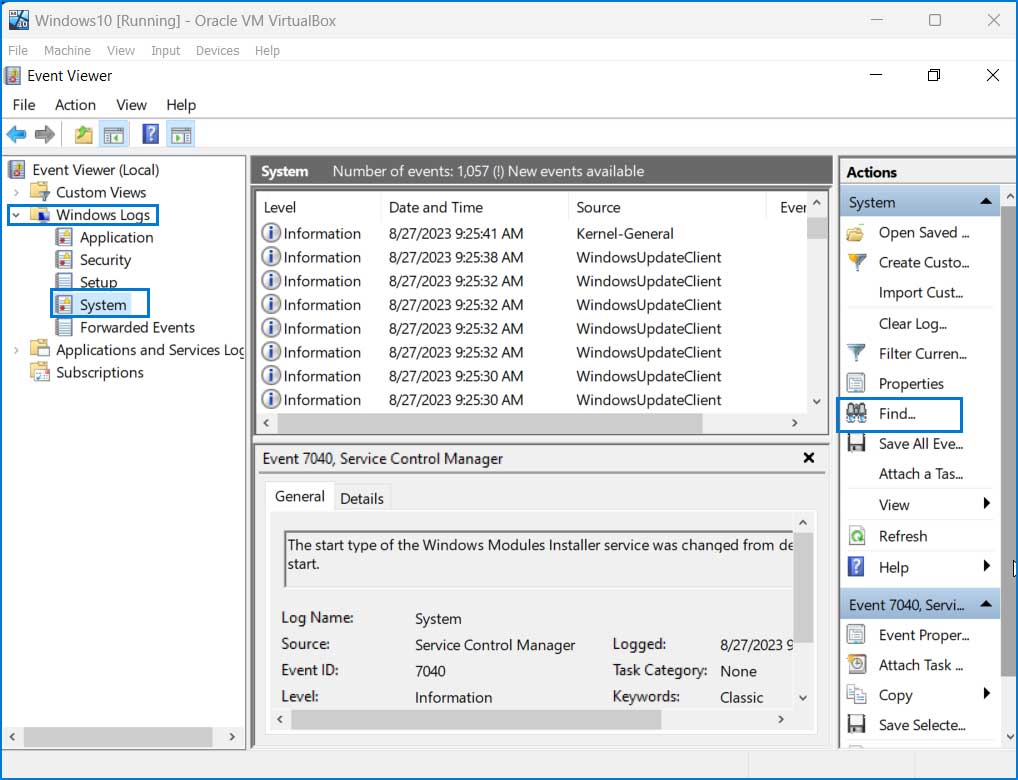
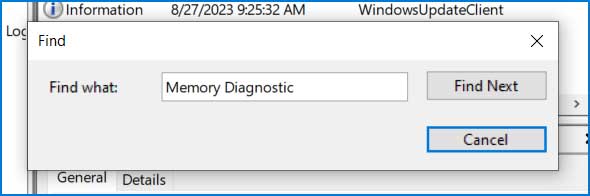
3. Click the "Find" button and search for Memory Diagnostic.
4. You will see the results of the Memory Diagnostic.
Solution 4: Check for Overheating
Overheating can lead to hardware instability. Ensure that your computer is properly cooled, and clean any dust from the fans and heat sinks.
Solution 5: Perform a System Restore
Microsoft offers the option to restore your Windows to a previous "last known good configuration." To perform a "System Restore," follow these steps:
System Restore - Step by Step
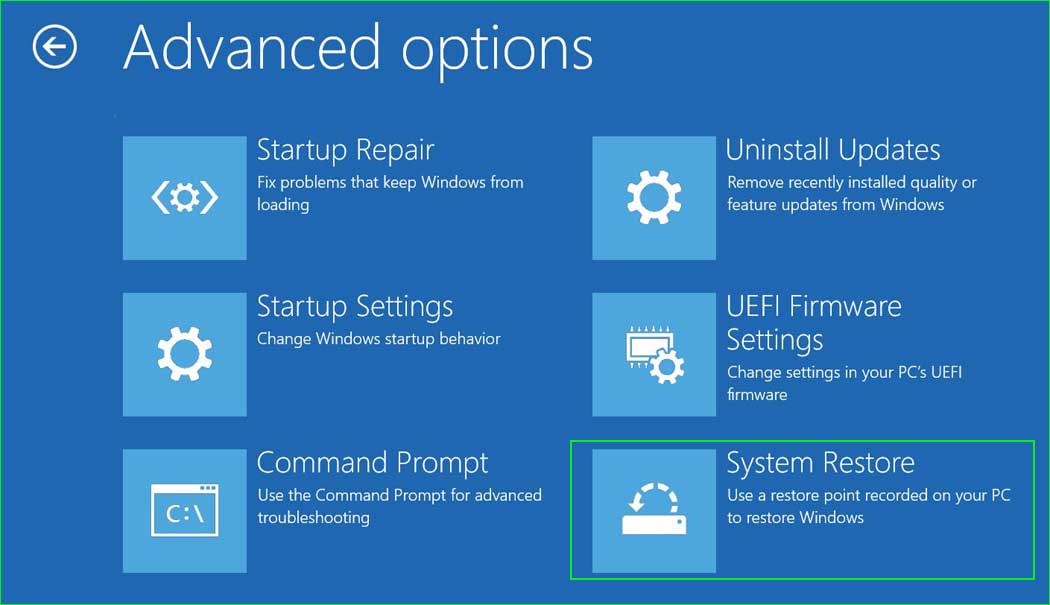
Step 1: Open the Advanced Startup Options or Windows Recovery Environment. Go to Troubleshoot ➜ Advanced Options ➜ System Restore.
system_restore
Step 2: Click Next and then select a date.
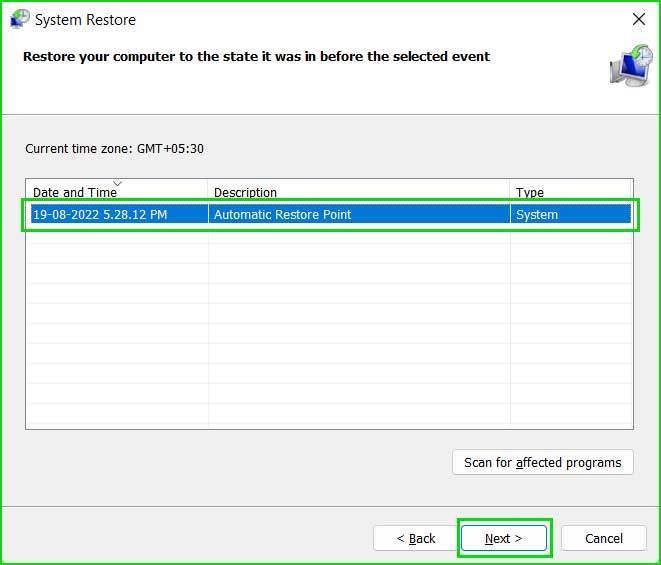
Select System Restore from the list
Step 3: Click "Finish" to start the restore process.
Solution 6: Repair Corrupted MBR/GPT
Most of the time, repairing the Master Boot Record (MBR)/GUID Partition Table (GPT) can easily resolve the issue. You can repair this file as follows:
Repair MBR using EaseUS
Step 1: Create a bootable USB drive using EaseUS. Launch EaseUS Partition Master, click on "Bootable Media" on the toolbar. Select "Create Bootable Media."
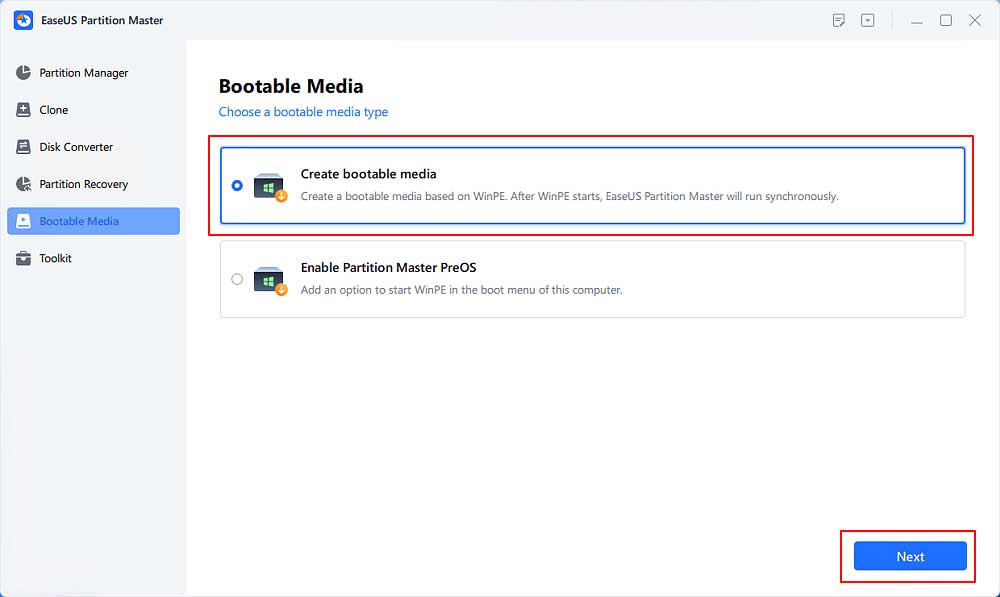
EaseUS Bootable Disk - 1
Step 2: Boot your computer using the bootable USB drive.
Step 3: Click on "Toolbox" and select "Rebuild MBR."
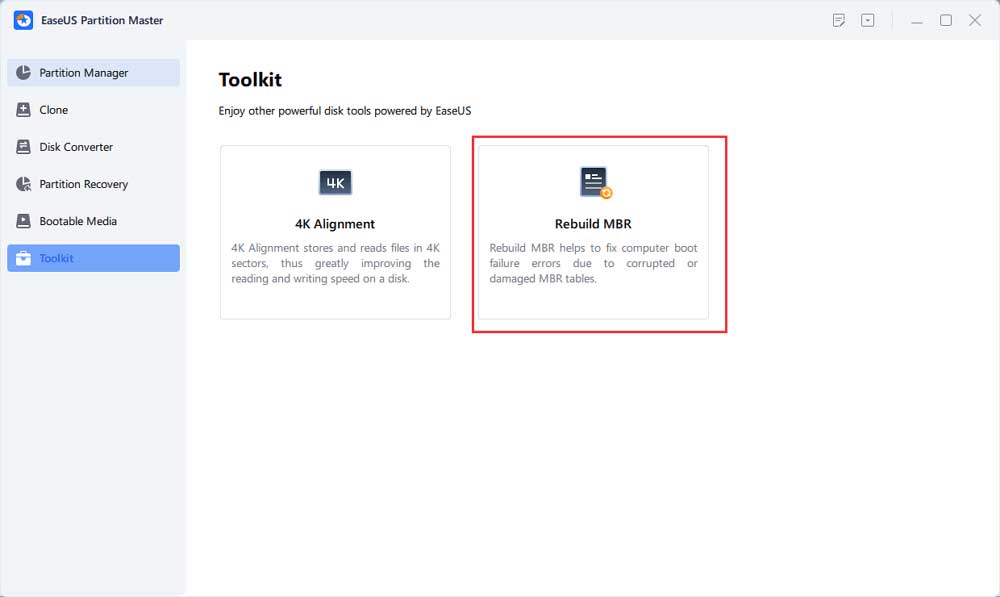
Repair MBR Manually - Step by Step
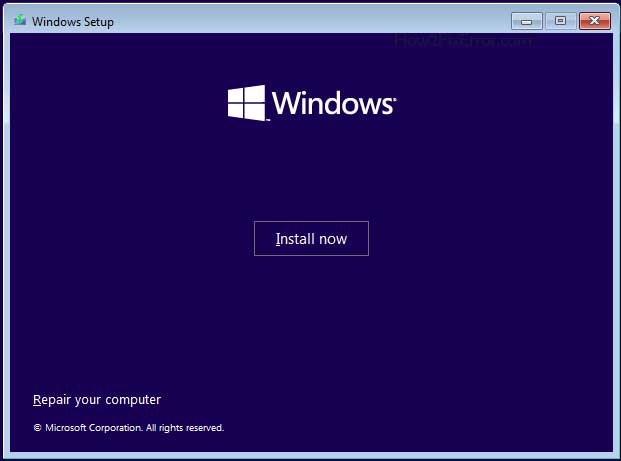
Step 1: Boot your computer using Windows installation media. The Windows Setup wizard will open. Click Next.
Install Windows Operating System
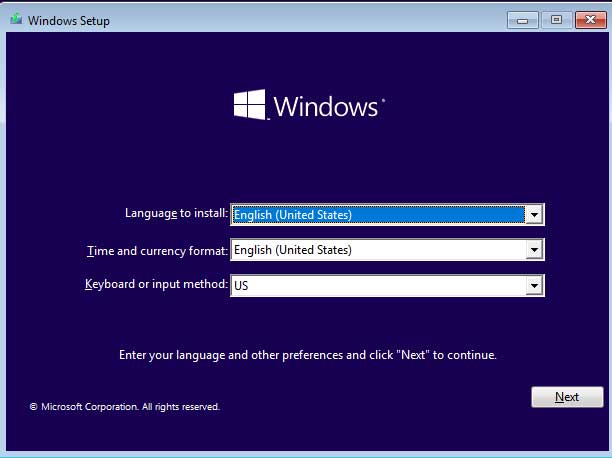
Step 2: Select Repair your computer.
 </
</


