

Is the Microsoft Authenticator app not working on Android and iPhone? Don't worry, you can restart the Microsoft Authenticator app with the help of this article.
The Microsoft Authenticator app is a well-known tool that can be used to generate two-factor authentication codes on your mobile device. However, it may not function effectively at times, even though it provides a secure login experience for Microsoft accounts as well as third-party accounts. When the app stops displaying requests or login codes on your Android or iPhone, it can be quite frustrating.
When it comes to Microsoft Authenticator, issues often arise due to incorrect settings or an inaccurate phone clock, and there may be other reasons as well. But whatever the cause, the good news is that you can resolve the issue of the Microsoft Authenticator app not working efficiently on Android and iPhone. Below is a list of several simple yet effective solutions to fix the problem.
How to Fix the Microsoft Authenticator App Not Working on Android and iPhone
Here are some tried-and-true solutions you can use to resolve the issue of the Microsoft Authenticator app not functioning properly on your mobile devices. Now, let's get started!
Fix 1: Close the App and Reopen It
On your mobile device, Microsoft Authenticator may behave oddly if one of its processes is having issues while running. Therefore, to fix the Microsoft Authenticator app that is not working, you will need to completely exit the app and then open it again.
On iPhone
Swipe up from the bottom of the screen to activate the app switcher, which will allow you to navigate between apps. Swipe up to exit the app when you locate the Microsoft Authenticator app.
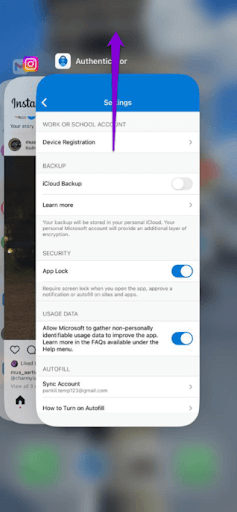
Microsoft Authenticator App
On Your Android Device
Locate the Microsoft Authenticator app icon and press and hold the icon, then select the "i" icon from the menu that appears to force close the app. After that, you will see the force stop option in the bottom right corner; just click on it.
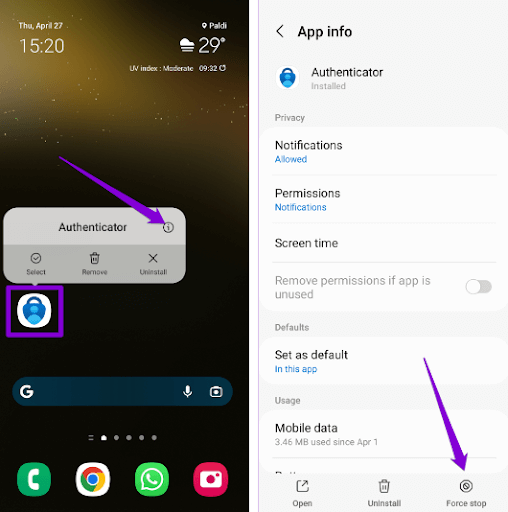
Try reopening the app on your mobile device to see if it works normally. If the Microsoft Authenticator app still has issues, proceed to the other solutions below.
Fix 2: Set Date and Time to Automatic
To generate codes, Microsoft Authenticator uses the current time on your device along with a secret key stored locally. The app will not function correctly if the clock on your phone is not synchronized with the time. Following the instructions below will allow you to enable the automatic date and time option on your phone, which will help resolve this issue.
On iPhone
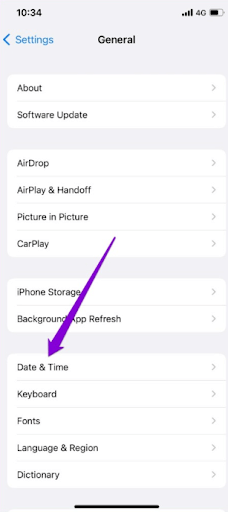
Step 1: Open the Settings app on your iPhone and navigate to the General section in the configuration menu.
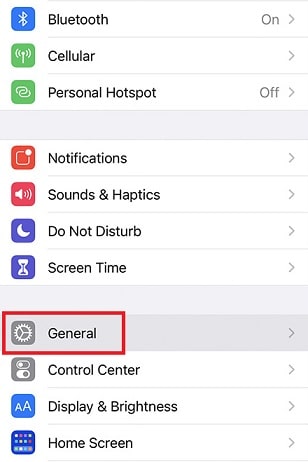
Step 2: Select the Date & Time option.
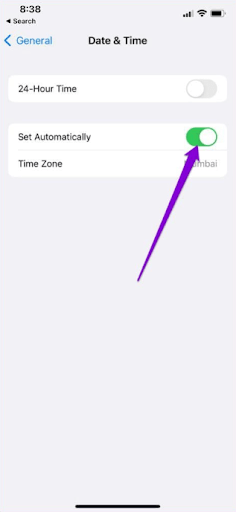
Step 3: Toggle the switch next to the Set Automatically option to enable it.
On Android
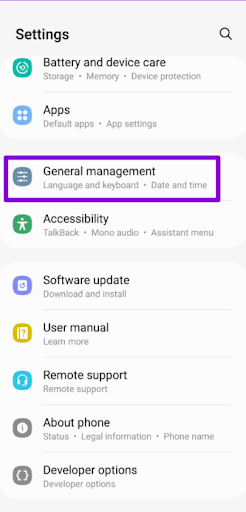
Step 1: Open the Settings app on your device and navigate to the General Management section.
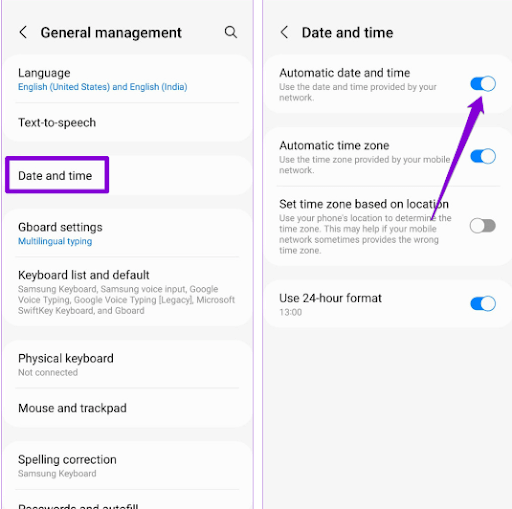
Step 2: Select Date and Time, then enable the Automatic date and time option.
Fix 3: Enable Notification Permissions
You need to grant permission to the Microsoft Authenticator app to show alerts on your iPhone or Android device, just like any other app. If you have already denied this permission, Microsoft Authenticator will not display any login approval requests on your mobile device under any circumstances. Here’s how to fix the Microsoft Authenticator app not working on Android and iPhone.
On iPhone
Step 1: First, open the Settings app on your iPhone.
Step 2: Scroll down until you find the Authenticator option and tap on it.
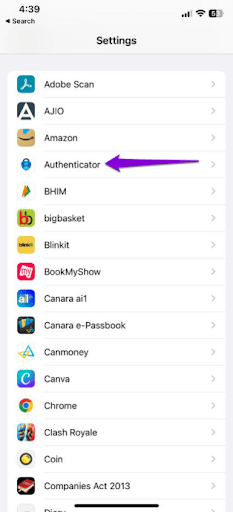
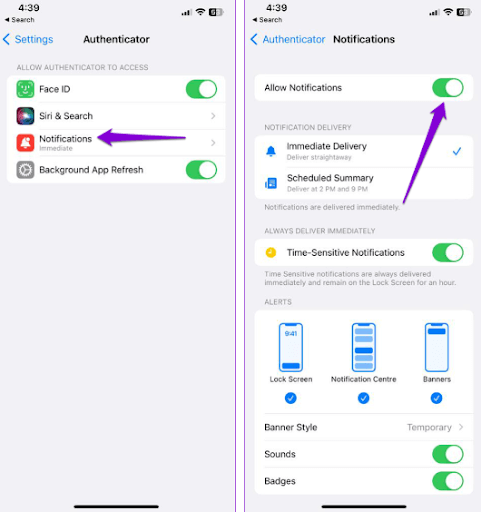
Step 3: Now, tap on the Notifications option and toggle the switch next to Allow Notifications to enable it.
On Android
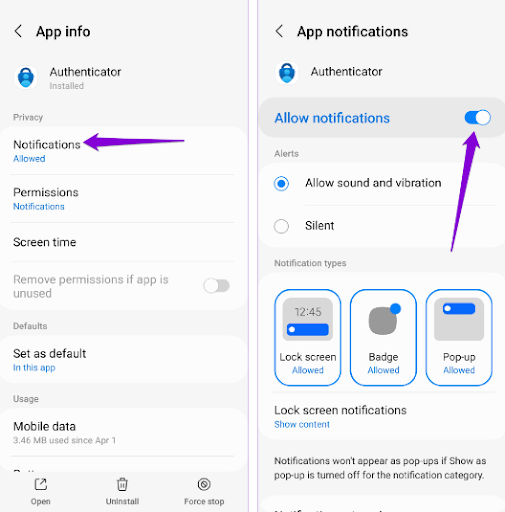
Step 1: Press and hold the Microsoft Authenticator app icon, then select the "i" information icon from the menu that appears.
Step 2: Next, tap on Notifications and activate the switch next to Allow Notifications in the menu that appears.
Fix 4: Clear App Cache (for Android)
It’s also possible that Microsoft Authenticator is not functioning correctly on your Android device if the cached files are either outdated or corrupted. You can try clearing the cache of the currently installed app to see if that improves the situation. Clearing the cache of the Microsoft Authenticator app will not delete any of your accounts. Try this by following these steps:
Step 1: Press and hold the Microsoft Authenticator app icon, then select the information icon from the menu that appears.
Step 2: Go to the Storage menu and select the Clear Cache option.
Go to the Storage menu and select the Clear Cache option.
Fix 5: Update the App
There’s a chance that Microsoft Authenticator is not working properly because you are using an outdated version of the app. As a last resort, you can try upgrading the app if nothing else resolves the issue.
You should check to see if there is a newer version available by going to the Google Play Store or the App Store, tap the update button for the app, and then check if that resolves the issue you are facing.
Conclusion
In this article, we discussed the Microsoft Authenticator app not working on Android and iPhone. Issues with Microsoft Authenticator can prevent you from accessing your accounts. Implementing the solutions outlined above may help resolve any underlying problems. However, if none of the above solutions work, you might want to consider using an alternative two-factor authentication app for your iPhone or Android device.
That’s all about how to resolve the issue of the Microsoft Authenticator app not working on Android and iPhone. We hope you found this troubleshooting guide helpful and informative. If you have any questions or suggestions, please let us know in the comments section below.


