


Solve the problem of MSVCR120.dll missing: You may encounter the MSVCR120.dll missing error while installing or opening certain applications and games.
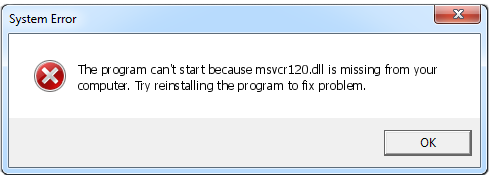
When this error appears, you might be unable to install or run the specific application. The error message may look like this:
The program cannot start because MSVCR120.dll is missing from your computer. Please reinstall the program/application to fix this issue.
How to fix the MSVCR120.dll missing issue on Windows 10/8/7
The MSVCR120.dll file is part of the Microsoft Visual C++ 2013 Redistributable package. This file is used for various purposes, and many third-party applications require it to function properly. If this file is missing, deleted, or corrupted for any reason, you may encounter the aforementioned error.
In this article, I will share some tried-and-true methods to resolve this error.
Method 1: Fix using Outbyte PC Repair Tool
The most common reason for the MSVCR120.dll error is the loss of corrupted or damaged system files such as DLL files, EXE files, sys files, etc. There are thousands of small system files that perform specific tasks, and if one of these files is replaced, deleted, or corrupted, you may receive the MSVCR120.dll not found or missing error.
Windows consists of a large number of dll files, exe files, sys files, various types of services, databases, and more, so it’s not always possible to keep track of all files. The excellent PC optimization tool repairs damage, fixes errors, updates Windows and drivers, and silently removes various types of errors.
The Outbyte PC Repair Tool performs all the above tasks effortlessly and provides you with a smooth and error-free Windows environment to work in so you can focus solely on your tasks.
3 steps to fix this error
Step 1. Download the Outbyte PC Repair Tool [File size: 16.4 MB]
Step 2. Scan your Windows computer
Step 3. Click the "Repair" button to fix the error
Method 2: Update the Runtime Library
Updating the Runtime Library from the Control Panel is one of the best and easiest ways to fix this error. Often, installing many other applications can change or replace the MSVCR120.dll file. By updating the Microsoft Visual C++ Runtime Library, you can restore this file.
1. Go to Control Panel > Uninstall a program
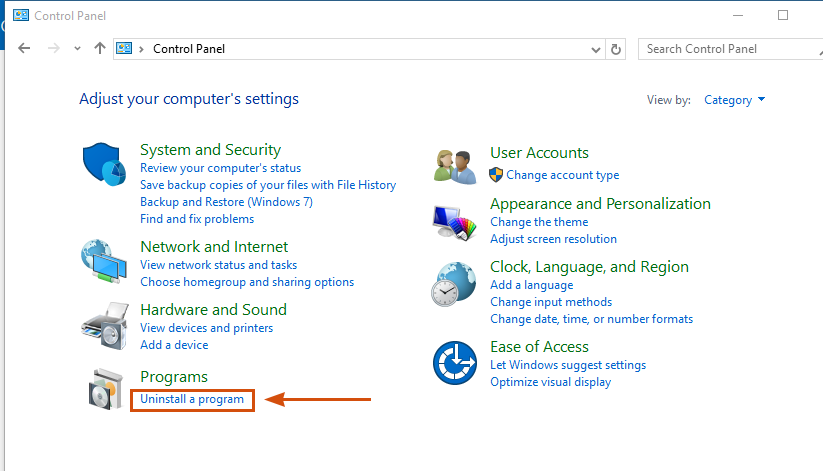
uninstall_program
2. Select the Microsoft Visual C++ 2012 Redistributable package, right-click on it, and select Change.
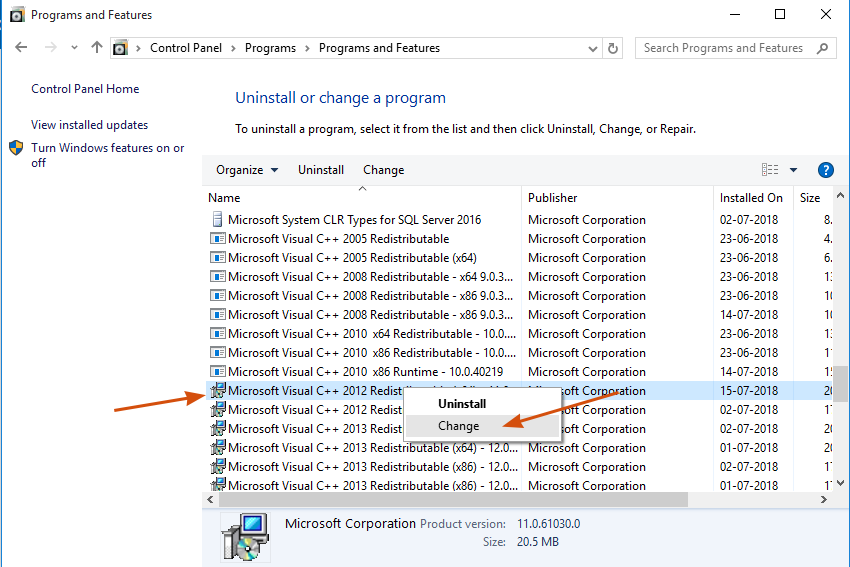
Repair_redistributable_file
3. Click the Repair button to start the repair process.
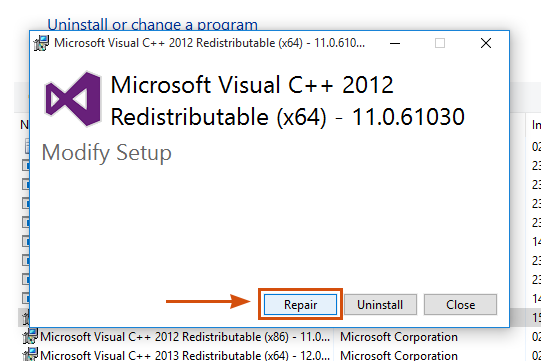
Repair_redistributable_file
4. You will see that the repair is in progress.
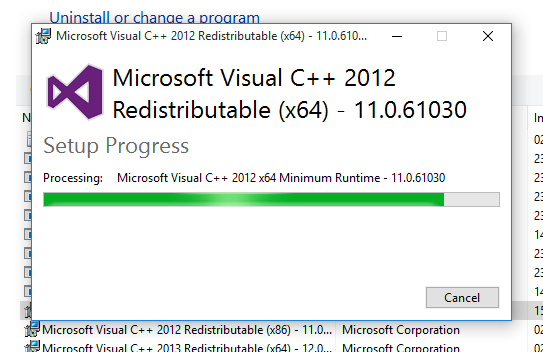
Repair_redistributable_file
5. Once the process is complete, you will be prompted to restart your computer.
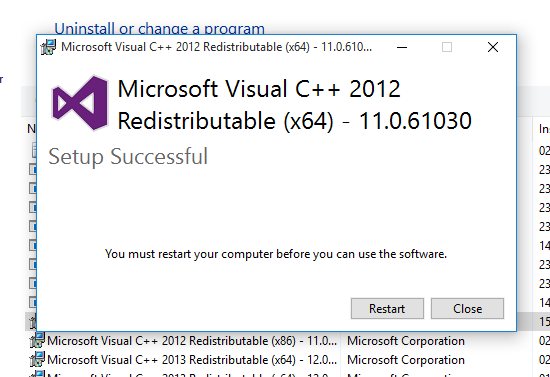
Repair_redistributable_file
Method 3: Install or reinstall the Visual C++ Redistributable Packages
Visit the following link to download and install the Visual C++ Redistributable Packages for Visual Studio 2013. It’s possible that you are facing an issue with this package or it is corrupted, which is why you are receiving this error. Reinstalling this package will definitely fix the MSVCR120.dll error.
https://www.microsoft.com/en-ph/download/details.aspx?id=40784
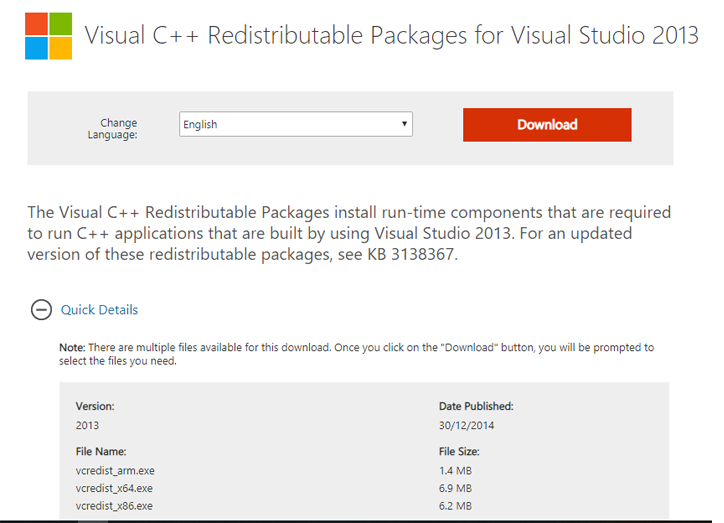
msvcr120_dll
Method 4: Update Windows and Drivers
It is also essential to update your Windows operating system and all installed drivers. When you update Windows, it automatically installs the latest patches and libraries. By updating the Windows operating system and drivers, you can easily fix the MSVCR120.dll missing error. If you are unsure how to update all installed drivers, use the advanced system repair tool. This tool automatically fixes errors, updates drivers, and installs missing dll files.
Method 5: Run the Windows System File Checker Tool
This tool provides additional regular support in case there are issues with Windows files. However, this tool may fail with major issues but works perfectly for minor problems. It scans all Windows files, finds missing or corrupted system files, and then updates the missing file with a new one. You can use the System File Checker tool as follows:
Step 1: Open Command Prompt as an administrator. Go to the Start menu and search for the command. Right-click on Command Prompt and select Run as administrator.
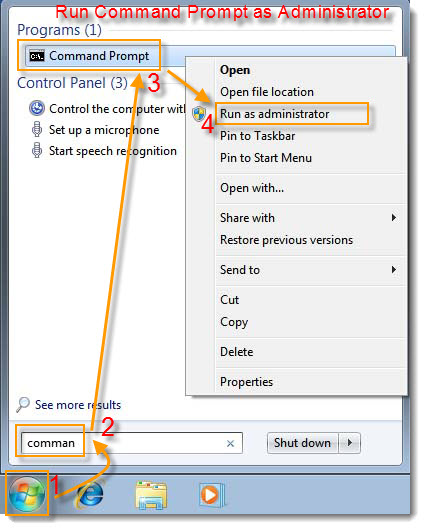
Run Command Prompt as Administrator
Step 2: Now type the following command and press Enter.
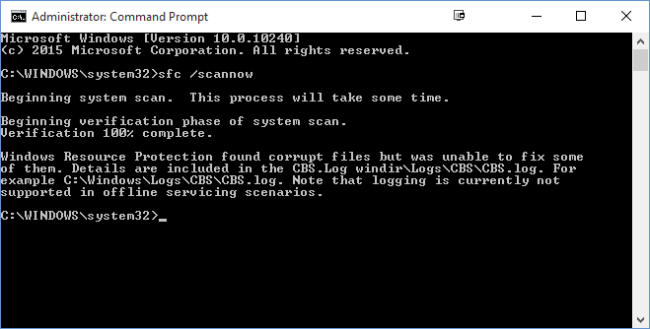
sfc /scannow
Run SFC now
Step 3: If you receive the error "Windows Resource Protection could not start the repair service" and cannot run the sfc /scannow command line tool, you can instead use the advanced system repair tool to scan and repair system files. It is much more powerful than the sfc /scannow tool.
Conclusion
In this article, I attempted to explain how to fix the MSVCR120.dll missing error on Windows 10/8/7. This error often appears when the C++ Runtime Library is corrupted or outdated. By updating this Runtime Library, you can easily eliminate this error.


