


Fixing the “Disc was not ejected properly” issue for Mac: Safe ejection of disks helps prevent data loss, and thus, the notification "Disc was not ejected properly" appears when you do not safely eject your external drive from your Mac.
However, many users have reported frustrating instances where this alert suddenly appears even if they haven't disconnected their external drives from their devices.
Are you facing a similar issue? If so, this article is the ultimate guide you need to fix the “Disc was not ejected properly” issue for Mac, where we will discuss tried-and-true solutions to this problem.
Let’s first discuss why the Mac notification "Disc was not ejected properly" appears even if you haven’t ejected the disk.
You can resolve the issue with much less effort if you know what might be causing it.
Reasons for improper disk ejection
Here are the potential reasons for receiving the unexpected unsafe disk ejection notification without actually ejecting the disk.
Operating system errors.
Issues with the external drive cable.
Any problem related to the hard disk.
Defective USB or other Mac ports.
Your device has entered sleep mode.
Corrupted NVRAM or PRAM.
We have listed the various factors above that may be responsible for the issue you are facing, and now let’s learn the best possible ways to resolve it.
Fixing the “Disc was not ejected properly” issue for Mac.
You can apply the following solutions to get rid of the Mac notification "Disc was not ejected properly".
Fix 1: Check the external drive cable
A faulty cable may be causing your external drive to disconnect from your Mac, leading to the annoying disk ejection notification. Therefore, try changing the connection cable to see if that resolves the issue.
Don’t worry, there are more solutions you can try if the problem persists.
Fix 2: Reset the power settings on your Mac
After updating to macOS Monterey, many users reported the frequent appearance of "Disc was not ejected properly" notifications after their Mac wakes from sleep mode.
This happens when there is an issue with the power settings, preventing the device from recognizing the connected drive after activity. Therefore, you can reset the power settings on your Mac by following these steps.
First, click on the Apple icon.
Second, select System Preferences from the menu on your screen.
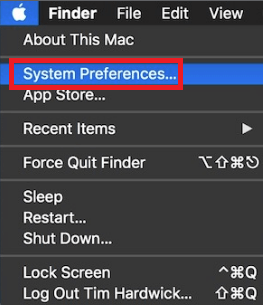
System Preferences
Now, look for the Energy Saver option and select it from the available options.
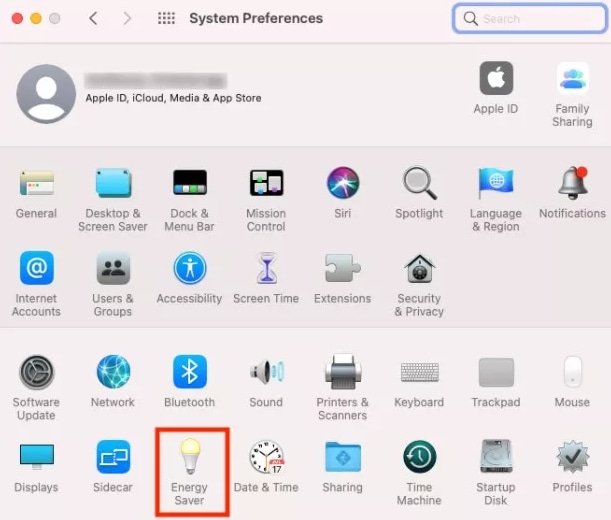
Energy Saver
Check the box to prevent the computer from sleeping automatically when the display is turned off.
MacBook users will see this option after selecting the power adapter in Energy Saver.
Uncheck the option to put hard disks to sleep when possible.
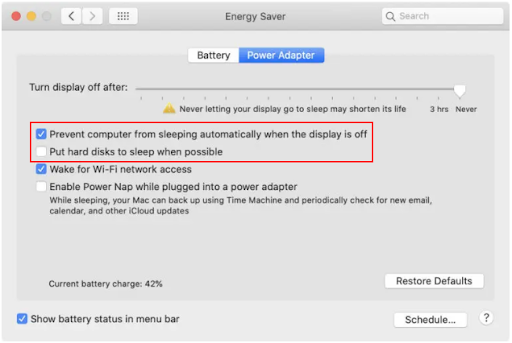
Finally, restart your Mac to complete the reset of the settings.
Fix 3: Try formatting your external hard drive
A malfunction in the external hard drive may be causing you to receive incorrect disk ejection notifications. Therefore, you can follow the instructions below to format the drive to fix the issue.
Please note that formatting the hard drive may erase some of your data, so be sure to back up your data before proceeding with the following steps.
First, go to Disk Utility and select the drive you want to format.
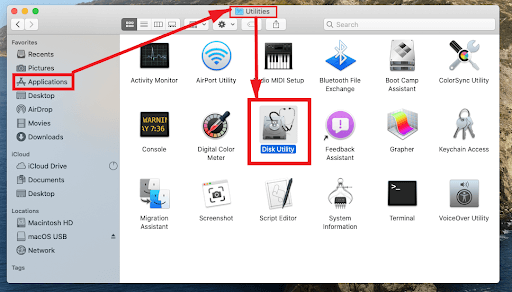
Select Disk Utility
Next, choose the disk format and scheme.
Click the "Erase" button to continue.
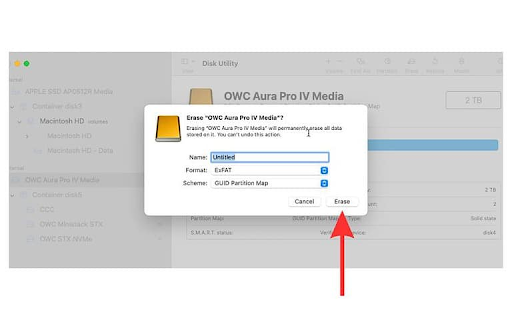
Erase Disk
You will now get a pop-up for the scheme.
Select GUID Partition Map from it.
Now, choose the file system format and enter the name of the drive.
We recommend using the exFAT file format, as it is compatible with both Mac and Windows operating systems.
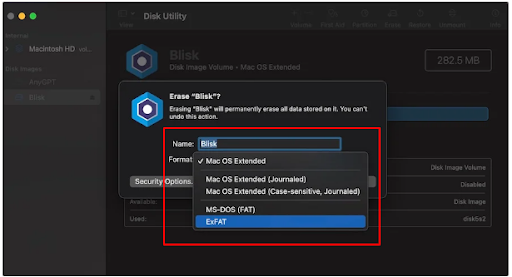
Erase Disk using ExFAT
You can select security options if your drive has additional features for ensuring security.
Choose how many times you want to overwrite the deleted data, then select OK.
Finally, select "Erase" and click "Done" to complete the formatting of the drive.
Fix 4: Use First Aid to perform a check on your external hard drive
The First Aid feature on Mac helps fix common errors on the external hard drive that may lead to the "Disc was not ejected properly" issue on Mac.
Therefore, you can follow these instructions to perform First Aid.
To start, go to Mac Finder.
Secondly, select the Go option at the top of the menu.
Now, select Utilities from the available options.
Double-click on Disk Utility to launch it.
Select Disk Utility
Select the connected external hard drive from the left side of the Disk Utility screen.
Select First Aid from the available options and click the run button.
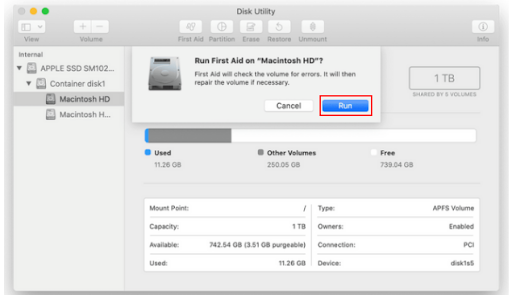
Select First Aid from the available options and click Run
Finally, wait for the First Aid process to complete.
Fix 5: Reset the NVRAM or PRAM on your Mac
NVRAM is responsible for storing your device's configuration information; however, you may encounter issues like "Disc was not ejected properly" on Mac if the NVRAM or PRAM is corrupted.
Therefore, here are the steps you can follow to reset the NVRAM/PRAM to keep the issue away from your Mac.
To start, turn off your Mac.
Second, press the Option, Command, P, and R keys on your Mac for twenty seconds.
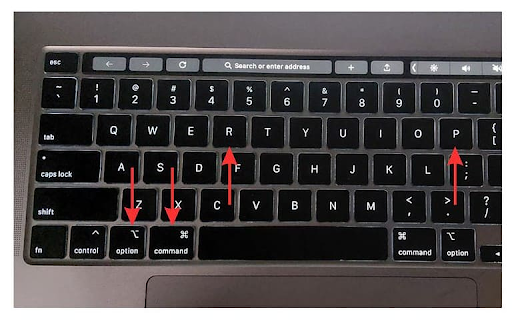
Reset the NVRAM or PRAM on your Mac
Finally, release all the keys mentioned above when the Apple logo appears twice on your screen.
Fix 6: Check the USB port
Many users need a USB adapter to connect their external hard drives to their Mac, so you can check the port for damage and use a different adapter to resolve the issue.
Fix 7: Update macOS
macOS is not immune to bugs; like any other operating system, random errors can affect its performance and cause issues like the one you are facing. Therefore, you can follow the steps below to update macOS to fix the bugs.
To start, select the Apple icon and choose System Preferences from the menu that appears.
System Preferences
Second, select General from the System Preferences menu.
Now, select Software Update from the general options.
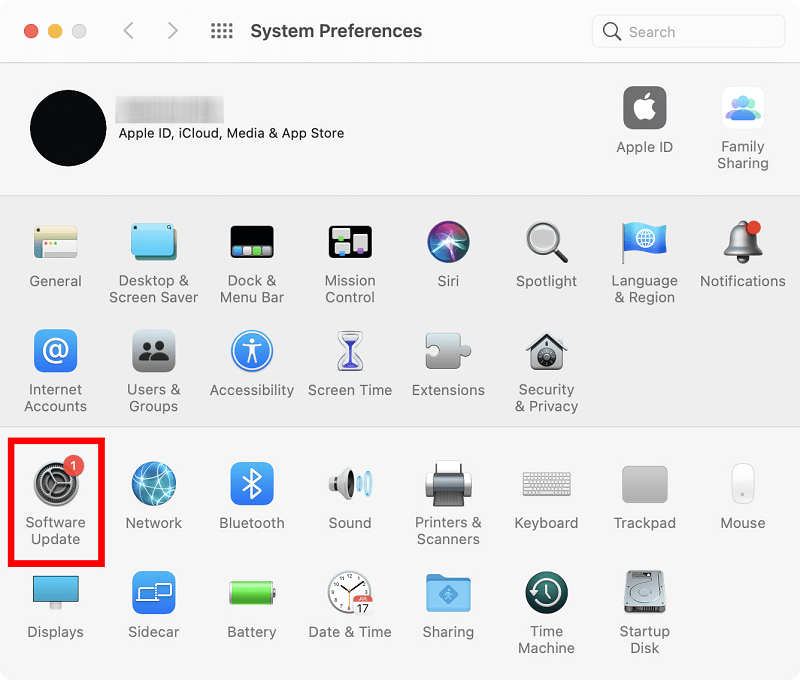
System Preferences and select Software Update.
Allow your Mac to find the available updates for your device.
Download and install the available macOS updates.
Finally, restart your Mac after completing the above process.
Conclusion
In this article, we discussed how to fix the “Disc was not ejected properly” issue for Mac. This article guides you through various fixes for the Mac disk ejection problem; you can start troubleshooting the issue with the first solution and continue until the problem disappears. However, if you have any questions or suggestions regarding this article, feel free to leave a comment in the comments section, and we will be happy to get in touch with you.
You might also like
How to Fix Error 0x80240017 on Windows 11/10
Fix Inaccessible_Boot_Device Error


