


(Solution to Error: NVIDIA software cannot be installed on - Windows 10/11) Solution for the error where NVIDIA software cannot be installed on - Windows 10/11: When installing the NVIDIA graphics driver on devices running Windows 11, 10, or 8, you may encounter one of the following issues:
NVIDIA Installer cannot continue, your system configuration is not supported.
In this article, we cover all the issues along with appropriate solutions so you can easily fix installation errors.
Solution for the error where NVIDIA software cannot be installed on - Windows 10/11
Method 1: Fix using the Advanced System Repair Tool
The most common reason for the error where NVIDIA software cannot be installed on - Windows 10/11 is due to missing system files, corrupted Windows files, missing dll files, incorrect registry files, outdated drivers, old windows, pending updates, malware, etc. It is recommended to use an advanced system repair tool to scan and fix most Windows issues.
Windows consists of a large number of dll files, exe files, sys files, various types of services, databases, and so on, so it is not always possible to keep track of all files. A great PC optimization tool repairs damages, fixes errors, updates windows and drivers, and silently removes various types of errors.
The Outbyte PC Repair Tool performs all the above tasks easily and provides you with a smooth and error-free Windows environment to work so you can focus solely on your work.
3 steps to fix this error
Step 1. Download the Outbyte PC Repair Tool [File size: 16.4 MB]
Step 2. Scan your computer running Windows
Step 3. Click the "Repair" button to fix the error
Method 2: Completely uninstall previous NVIDIA installations
If you have tried installing the software before, you should perform a complete removal of any previous traces of NVIDIA software before starting a new installation. An incomplete previous installation interferes with the current installation and causes problems. You can manually remove the previous NVIDIA software as follows:
Step 1: Right-click the Start button and select Settings. Go to Apps ➜ Apps & Features. Find the NVIDIA graphics driver and NVIDIA Control Panel and uninstall both.
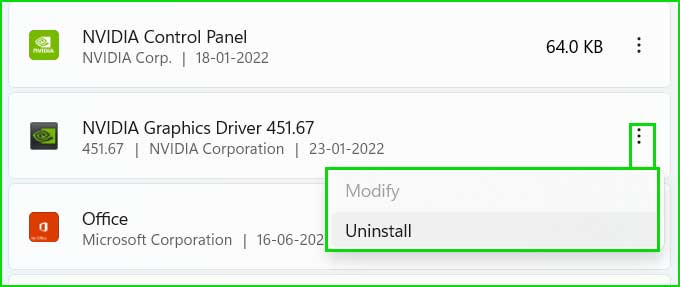
Remove the NVIDIA graphics card from the control panel
Step 2: Go to File Explorer ➜ Windows Drive (usually C:) ➜ find NVIDIA Corporation. Right-click this folder and delete it.
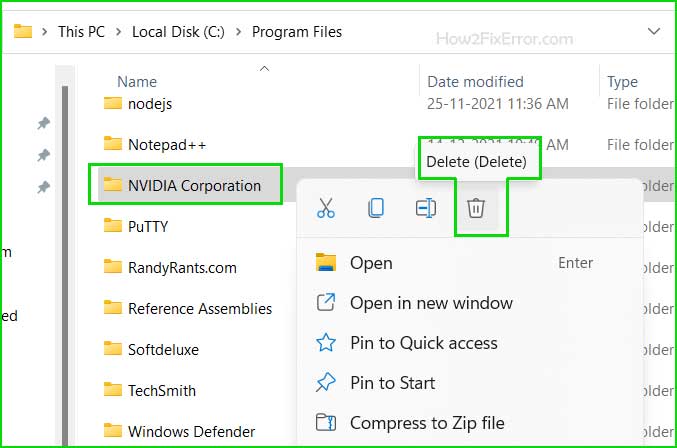
Remove NVIDIA from Program Files
Step 3: Open the Registry Editor by typing regedit in the Run command window. Before editing this file, you should back up the registry file and save it in an external location (USB drive, external SSD, etc.).
Look for the following keys and rename them.
Computer\HKEY_LOCAL_MACHINE\SOFTWARE\NVIDIA Corporation
Right-click on NVIDIA Corporation and rename it to NVIDIA Corporation_old.
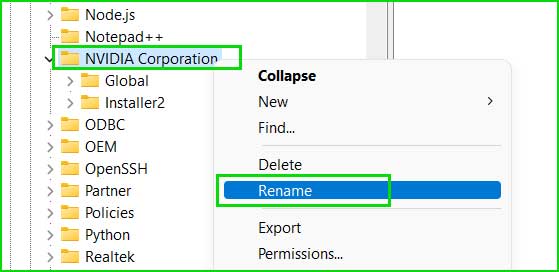
Rename NVIDIA in the registry file
Step 4: Restart your computer to apply the change.
Step 5: Upon reboot, try running the NVIDIA Installer again.
Method 3: Run DDU for complete removal of NVIDIA traces.
If you cannot manually remove the NVIDIA graphics driver, you can use the DDU tool to completely remove NVIDIA graphics. DDU stands for Display Driver Uninstaller, and this tool is used to remove graphics drivers from your computer.
Search Google for "Download DDU Display Driver Uninstaller" and download it. Alternatively, you can download it from here.
https://www.filehorse.com/download-display-driver-uninstaller-ddu/
Install this tool and run it in safe mode. This tool works well when you start your computer in safe mode. After that, try running the new NVIDIA installation file.
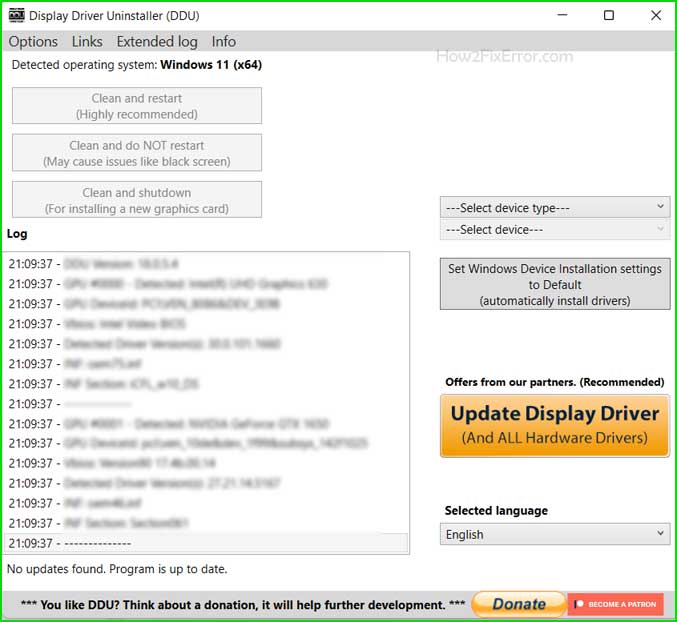
DDU graphics removal tool
Method 4: Run the Installation and Uninstallation Troubleshooter
If you are having issues installing or uninstalling any applications on your computer, you can use the Microsoft Installation and Uninstallation Troubleshooter for free. You can download the troubleshooter from the Microsoft website.
Search Google/Bing for "Installation and Uninstallation Troubleshooter" and open the Microsoft site. Alternatively, you can download this tool from here.
https://support.microsoft.com/en-us/topic/fix-problems-that-block-programs-from-being-installed-or-removed-cca7d1b6-65a9-3d98-426b-e9f927e1eb4d
Run this tool to fix any installation and uninstallation issues on your computer. This tool effectively performs the following tasks.
Fix corrupted registry entries.
Fix issues preventing new installations.
Fix issues preventing previous uninstalls, etc.
Method 5: Restore Windows
The Windows Restore tool restores Windows settings to the last known good configuration. This is one of the best ways to fix any critical issues in Windows operating systems.
Step 1: Click the "Start" button and search for "System Restore," then open "Create a restore point."
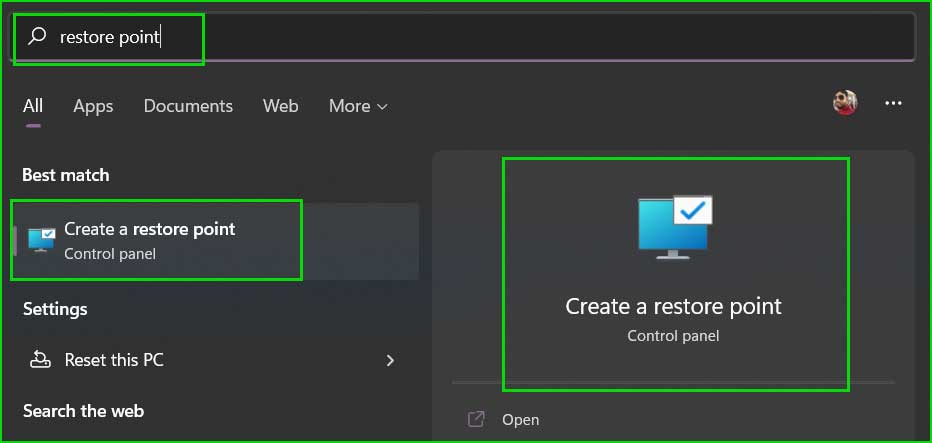
Find the restore settings in the Start menu
Step 2: Click the System Restore button.
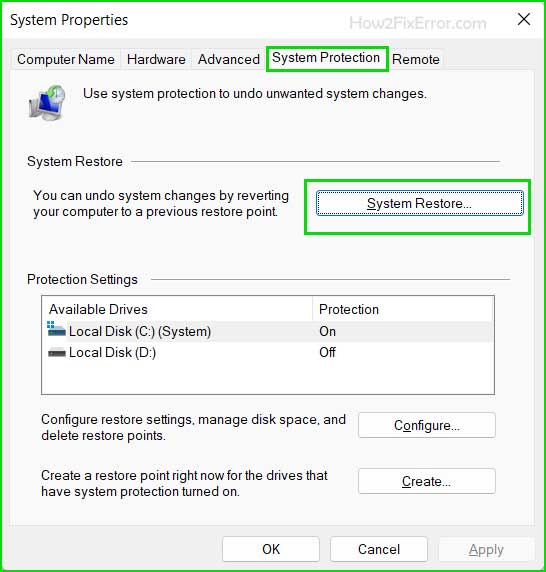
Open System Restore settings in Windows 11 and 10
Step 3: Select recommended restore and click Next. Go to the restore settings and complete the restore process.
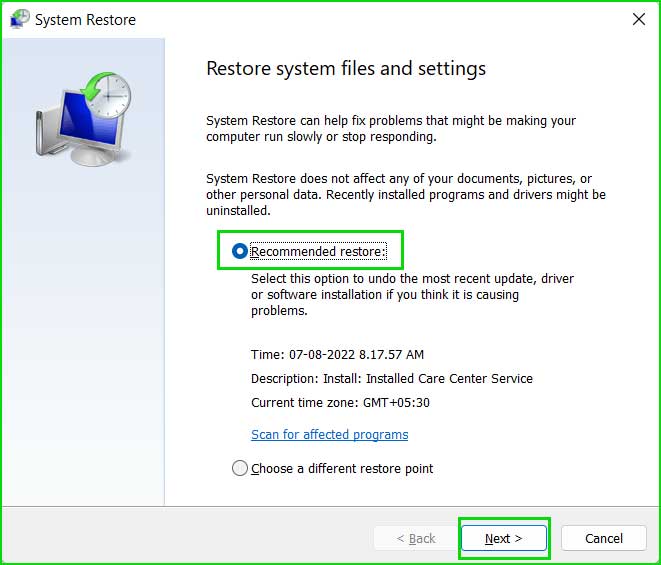
System restore is recommended for Windows 10 and 11
Step 4: After rebooting, try running the NVIDIA Installer. You are likely to not encounter the "NVIDIA Installer cannot continue" error.
Conclusion
We discussed the solution for the error where NVIDIA software cannot be installed on - Windows 10/11.
If you are looking for a solution to the problem of being unable to install the NVIDIA Installer, this article may help you a lot. Just follow the steps and guidelines to fix screen driver installation issues on Windows 11, 10, and 8.


