


Fixing the issue of the hard drive not appearing on Windows 10: No one can underestimate the importance of data backup. Although cloud storage has become popular in recent years, nothing beats saving everything on a physical device. Moreover, external drives are user-friendly: you can plug them in, and they will show up on your computer, allowing you to simply drag files onto them. But what if your hard drive doesn’t show up on your Windows 10 computer when connected?
Windows 10 usually detects a USB drive or hard drive and sets it up automatically when one of these devices is connected to a computer. So, why isn’t your new hard drive appearing in Windows, and how can you fix it?
Windows 10 offers several solutions to regain access to the drive. This article will discuss the reasons behind this issue and how to resolve the problem of the hard drive not appearing on Windows 10. So, let’s get started.
How to Fix the Hard Drive Not Appearing on Windows 10
If you’re wondering why the hard drive isn’t showing up in Windows, there could be several reasons. However, you can follow these simple tips to resolve the issue preventing File Explorer from displaying the hard drive.
How to Fix the Hard Drive Not Appearing on Windows 10 Using Troubleshooting
There are various reasons why the new hard drive may not appear in Disk Management on Windows 10 computers. Before checking and changing system settings, you can try these simple troubleshooting steps:
- Ensure the hard drive is powered on and properly connected to the computer.
- Disconnect the external USB hard drive and try using a different USB port. If you’re using a USB hub, connect the drive directly to the computer.
- Check that the data and power cables are securely connected to the storage device, motherboard, and power supply. Turn off the computer and unplug it before inspecting the internal components.
- Connect the drive to another computer to ensure that the device isn’t the problem.
- Make sure the firmware recognizes the storage by accessing the Basic Input/Output System (BIOS) or Unified Extensible Firmware Interface (UEFI) of the computer. Review the manufacturer’s support site for detailed instructions, as motherboard firmware varies by manufacturer and model.
How to Fix the Hard Drive Not Appearing Using Device Manager
If the hard drive doesn’t show up in Disk Management or File Explorer, it may indicate that the hard drive is disabled. If that’s the case, you can enable it immediately using Device Manager.
Follow these steps to enable the hard drive in Device Manager:
1. Click on Start.
2. To launch the application, search for "Device Manager" and select the top result.
3. Expand the Disk drives section.
4. Right-click on the hard drive and select Properties.
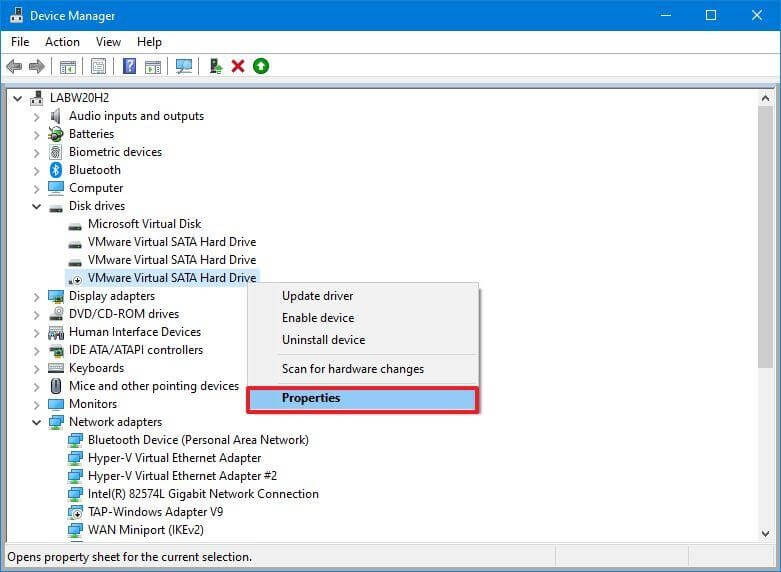
Right-click on the hard drive and select Properties
5. Click on the Driver tab.
6. Select the Enable Device button.
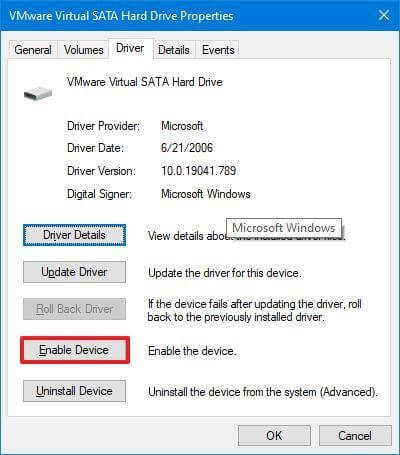
Hard drive properties - Enable device
7. Click OK.
After completing these steps, you should be able to access the hard drive and its data on your computer.
How to Fix the Hard Drive Not Appearing on Windows 10 Using Disk Management
The hard drive must meet certain conditions to be accessible in File Explorer. The device must be powered on and initialized, the partition must be configured correctly, and it should be assigned a drive letter or mounted as a folder.
The techniques outlined below will help you troubleshoot and resolve common Disk Management issues if you encounter any of these problems.
Bring Drive Online
Use these steps to bring the hard drive online:
- Press the Start button.
- Search for "Disk Management" and select the top result to launch the application.
- Right-click on the disk labeled "Offline" and select the "Online" option.
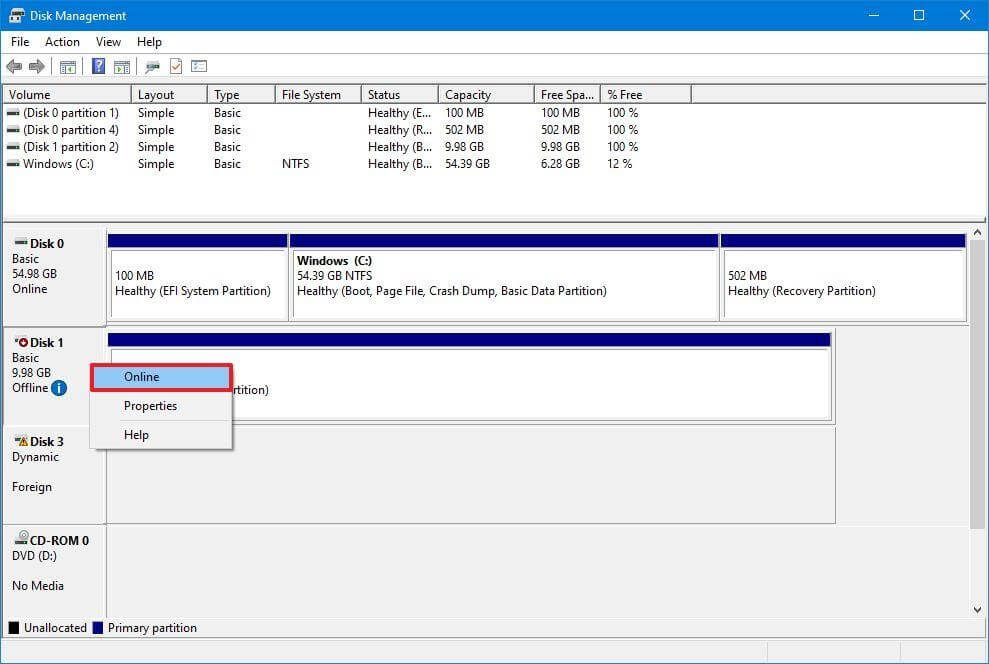
Disk Management - Bring Disk Online
- If the hard drive was offline and previously set up, it should appear in File Explorer after completing the instructions. Follow the steps below if the drive is offline and has never been set up.
Format the Drive
To format the hard drive on Windows 10, use the following steps:
- Click on Start.
- To open the application, search for Disk Management and select the top result.
- Right-click on the disk labeled "Unknown" and choose "Format Disk" from the context menu.
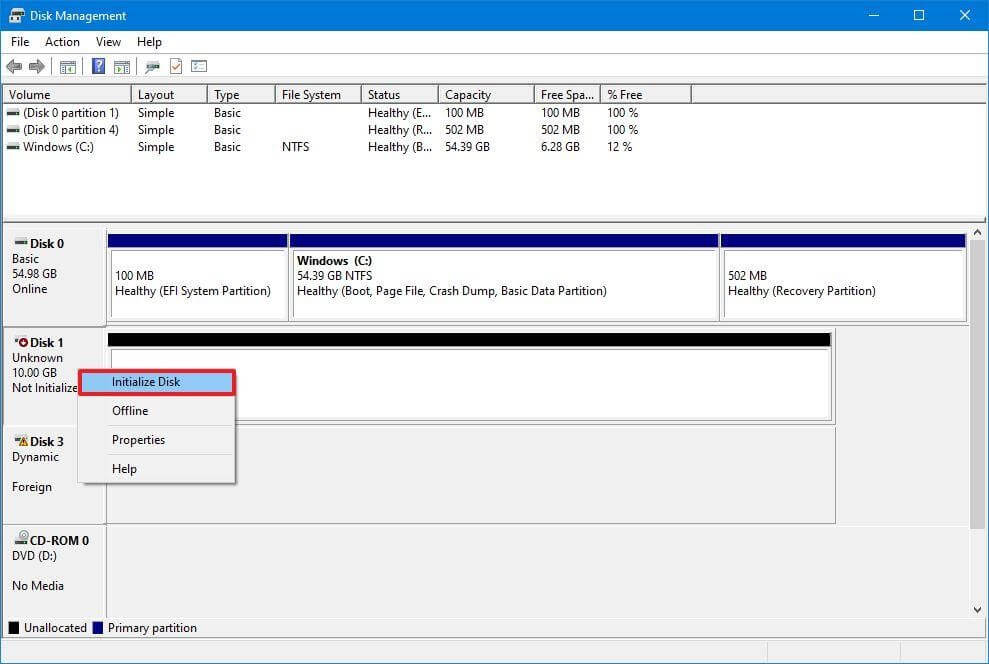
Format the Drive
- Select the drive you want to format under the "Select Disks" section.
- Click on GPT (GUID Partition Table).
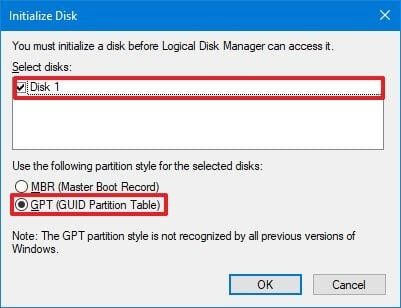
GPT (GUID Partition Table)
- Click OK.
- If the storage hasn’t been formatted, this action will erase everything on the drive and prepare it for formatting afterward.
Import External Drive
You will need to import the drive using the "Disk Management" tool if the drive you’re trying to access was set up on another computer as a dynamic disk, as it will appear as an external drive on this device. However, the data should be accessible during this process without loss, although it’s still advisable to create a backup of the data before proceeding with the next steps.
Use these steps to import a dynamic disk so that File Explorer can access it:
1. To launch the application, type "Disk Management" and click on the top result.
2. Right-click on the disk labeled "Dynamic" and select "Import Foreign Disks" from the context menu.
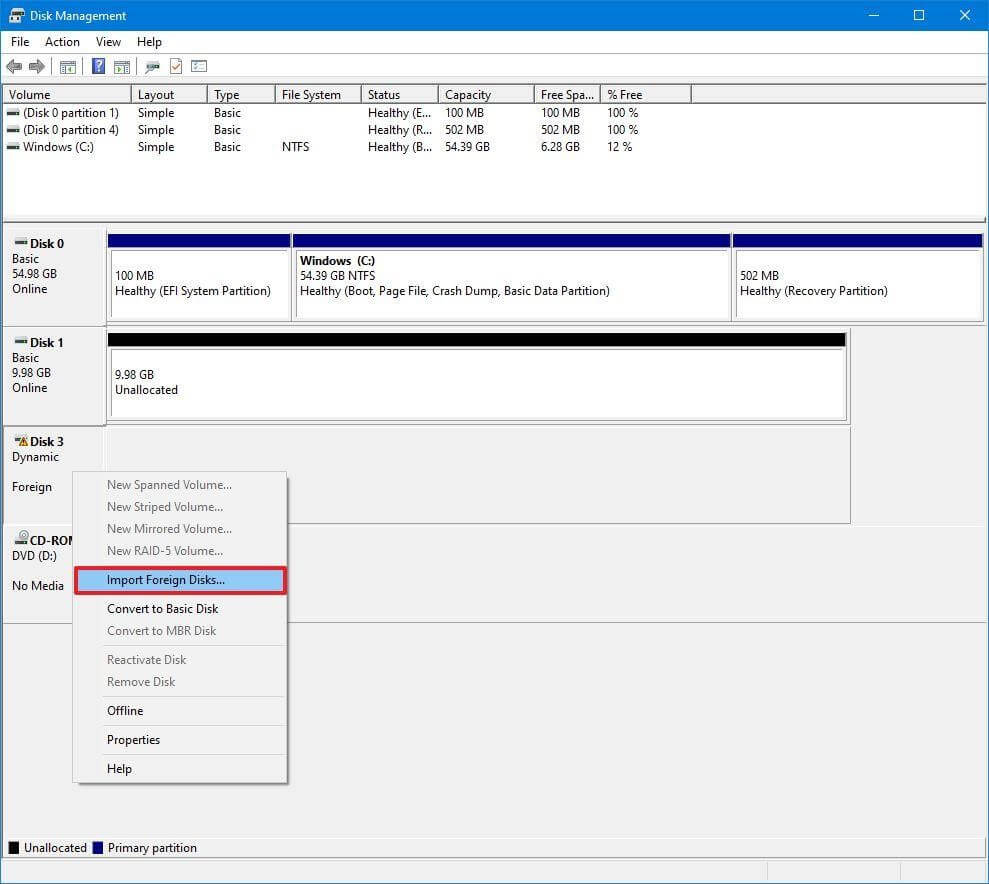
Import External Drive
3. Select the Foreign Disk Group (1 of 1 Disk) in the "Disk Groups" section.
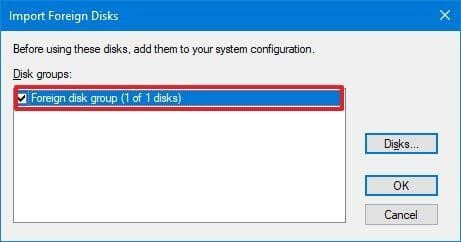
Disk Groups
4. Click OK.
5. Click the OK button again.
6. The hard drive will be imported after completing the instructions, and File Explorer or any other program will be able to access the data.
Assign Drive Letter
When the hard drive is connected and initialized on Windows 10 but doesn’t show up in the system, there are two potential reasons. First, the drive doesn’t have a drive letter assigned to it, and second, if it’s connected to a different computer, the new system may attempt to assign the same drive letter that has already been assigned to another disk on the device.
Follow these instructions to assign a drive letter to the storage media on Windows 10:
- Press the Start button.
- Type "Disk Management" and select the top result to launch the application.
- Use the Change Drive Letter and Paths option when right-clicking on the partition of the hard drive that doesn’t have a drive letter.
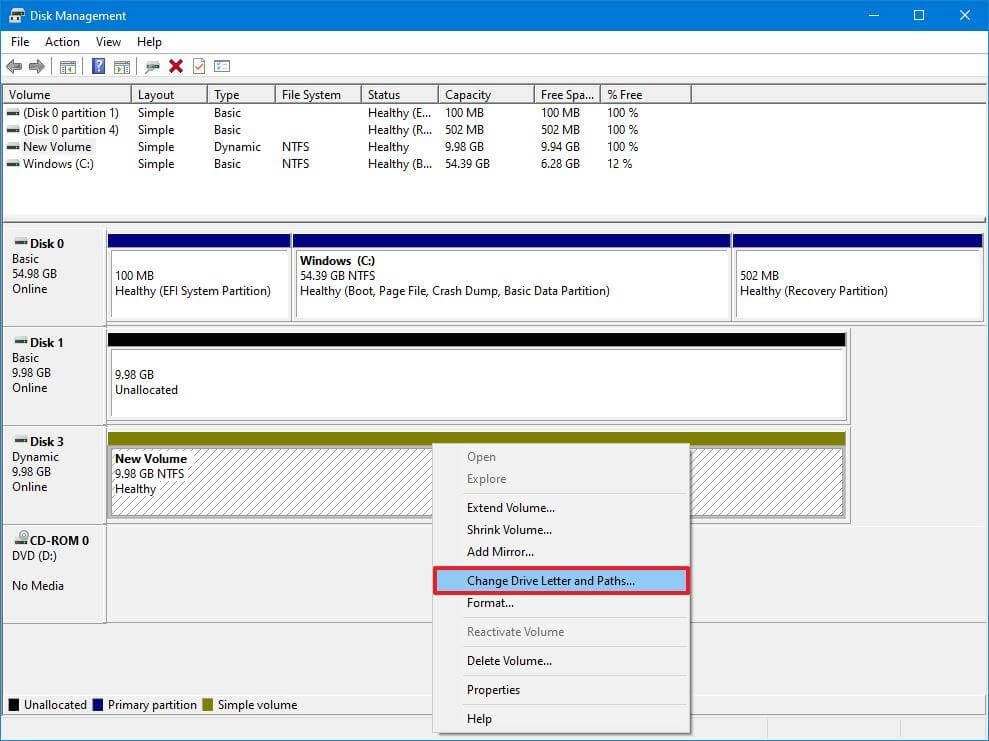
Change Drive Letter and Paths
- Click the Add button.
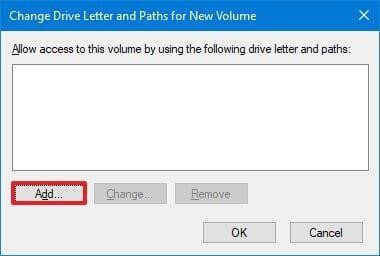
Change Drive Letter and Paths - Add
- Select the option Assign the following drive letter.
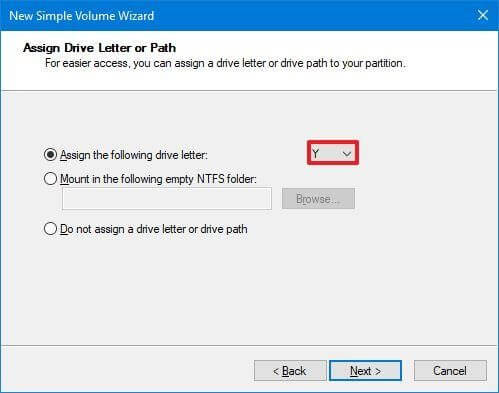
Assign the following drive letter to the storage unit
- Select a drive letter from the dropdown list - for example, Z, X, or Y.
- Click OK.
- After completing the instructions, the hard drive data should now be accessible using File Explorer.
Create a New Partition
If the device is connected and initialized, you may be dealing with a disk that has no formatted partition. In this case, you can create the partition using the Disk Management wizard.
Use these steps to create and format the hard drive so that it can be seen in File Explorer:
1. Click on Start.
2. To open the application, search for Disk Management and select the top result.
3. Choose the New Simple Volume option from the context menu when you right-click on the disk partition that doesn’t have a drive letter.
4. Click Next.
5. To utilize the entire partition space, click the next option. If not, enter the desired size in the Simple Volume size option in MB.
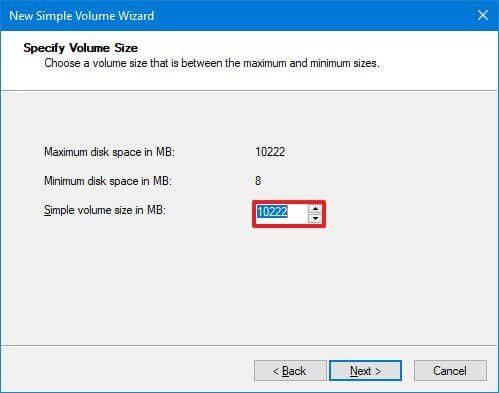
Select the option Assign the following drive letter.
6. Select a drive letter from the dropdown list - for example, Z, X, or Y.
7. Click Next.
8. Select the option Format this volume with the following settings.
9. Choose the NTFS option from the dropdown list for "File System."
10. Select the default option from the dropdown list for "Allocation Unit Size."
11. Confirm the volume label for the drive in the "Volume Label" field - for example, Data.
12. Select the option Perform a quick format.
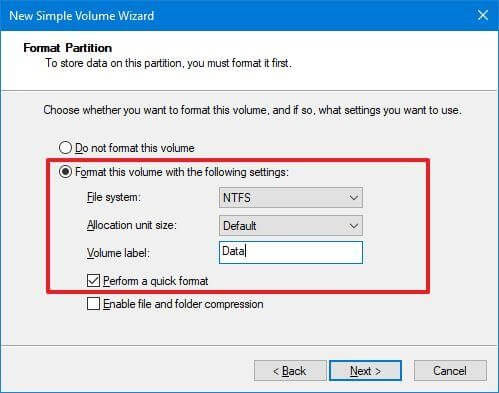
Format Partition
<


