


How to Fix WD Passport Not Showing Up on Mac: The Western Digital (WD) Passport is a portable storage drive compatible with USB-C, allowing you to store, organize, and share various files (like photos, documents, and videos). In addition to its portability, this drive is well-known for protecting your files with built-in 256-bit AES hardware encryption and password protection. However, some users have reported issues with WD Passport not appearing on Mac.
If you're one of those users, this article serves as the guide you need to quickly and efficiently resolve the issue. However, it's essential to understand the cause of the problem before attempting to fix it for better troubleshooting.
Why Is WD Passport Not Showing Up on Your Mac?
The following factors may be the reason why WD Passport is not detected or not appearing on your Mac.
- There may be an issue with the USB port on your device, making it unresponsive.
- The USB cable might be damaged.
- Your Mac could be overloaded with multiple applications running simultaneously.
- The display settings on your Mac may not be configured correctly.
- Your drive could be damaged or malfunctioning.
- After identifying the potential causes of the issue, let's provide you with the necessary solutions.
How to Fix WD Passport Not Showing Up on Mac
You can apply the following fixes to resolve this issue:
Fix 1: Try Using a Different USB Port
The USB port you are using may not be responsive, so you can try a different port to see if that resolves the issue before attempting more complex solutions. However, you can try the following solutions if WD Passport still does not appear on your Mac.
Fix 2: Test and Replace the USB Cable
A damaged USB cable is another reason for encountering issues with WD Passport on your Mac. Therefore, you can check the cable for damage and replace it if necessary to resolve the problem.
Fix 3: Restart Your Mac
If multiple applications have been running on your device for a long time, it may become overloaded, leading to issues like WD Passport not appearing. Therefore, you can restart your Mac to give it some relief and fix the problem.
To do this, follow these steps:
First, click on the Apple icon to open the Apple menu.
Second, select Restart from the menu that appears on your screen to reboot your device.
Fix 4: Use Disk Utility to Reformat Your Drive
Mac devices primarily support APFS and HFS file systems. If WD My Passport was previously formatted using NTFS or any other unsupported system by macOS, your device may not be able to read and access the My Passport drive. Therefore, you can reformat the drive to a supported file system, such as APFS, HFS+, or exFAT. Here are the steps to do that.
To start the reformatting process, go to Disk Utility by following the path Finder>Applications>Utilities.
Next, select WD My Passport from the left sidebar of the Disk Utility tool.
You can now choose "Erase" from the top menu to reformat the drive.
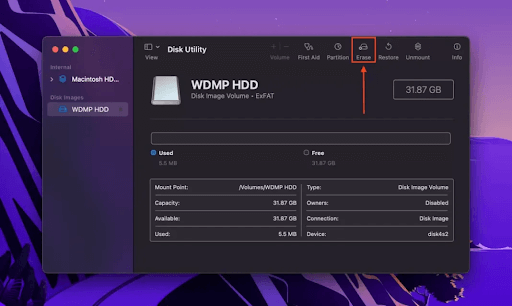
Click on Erase for WD Passport
Then, rename your WD Passport drive and choose the new format for your drive.
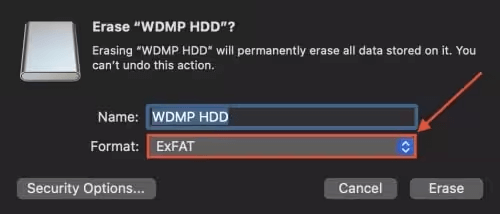
Rename your WD Passport drive
Finally, click the "Erase" button to complete the above process.
Fix 5: Repair the Drive Using First Aid in Disk Utility
Drive errors or a corrupted file system is another factor causing WD Passport not to show up on Mac. Therefore, you can use First Aid in Disk Utility to automatically detect and repair drive issues.
Here are the step-by-step instructions for using this tool:
First, follow the path Finder>Applications>Utilities and select Disk Utility from the available options.
Second, select WD My Passport from the left panel of the Disk Utility window.
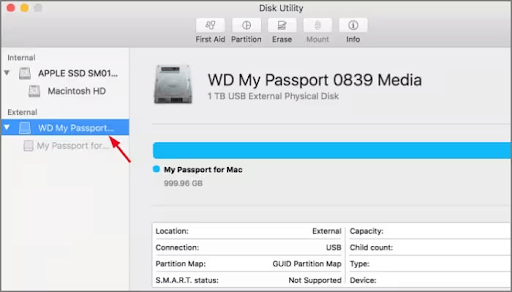
WD My Passport from the left panel of Disk Utility
Next, choose First Aid from the top menu of the Disk Utility window.
Finally, click the "Run" button to run First Aid on your Mac.
Fix 6: Check Your Mac's Display Settings
Mac devices hide external devices (like mice and external drives) to ensure a smooth user experience. Therefore, enabling hidden devices may have caused WD Passport not to appear on your device. You can follow these steps to check for hidden devices and disable them through your device's display settings.
First, go to Finder on your Mac.
Second, select Preferences from the options in the available menu.
Next, select General from the top menu of Finder Preferences.
You can now ensure that the external disks option is checked.
Then, select Sidebar from the top menu.
In the final step, you need to go to Locations and check the external disks option.
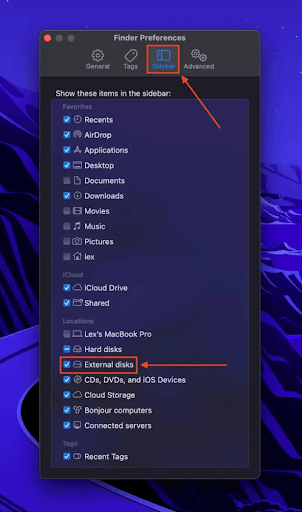
Ensure the external disks option is checked
Fix 7: Mount the Drive Using Disk Utility
Although mounting the drive is an automatic process, sometimes it does not happen automatically, leading to the issue you are facing. Therefore, here's how to resolve the issue by manually mounting the drive through Disk Utility.
The first step is to navigate through the path Finder>Applications>Utilities to access Disk Utility.
Once Disk Utility appears on your screen, select the Show All Devices option from the left panel.
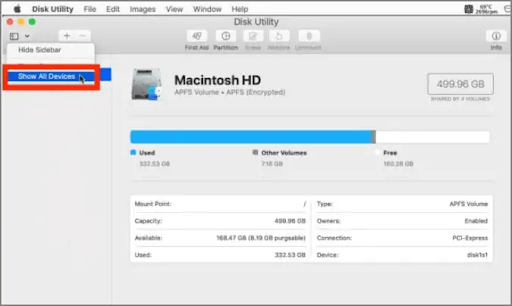
Show All Devices from the left panel
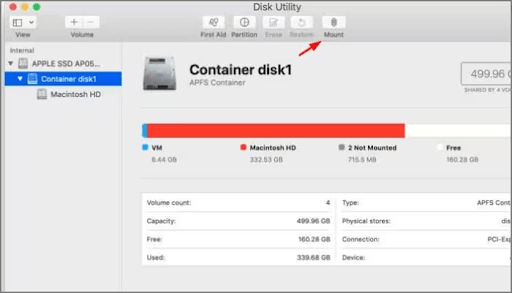
You can now click on your WD Passport drive to open it.
Finally, select Mount from the top menu to mount the drive.
Fix 8: Update the Drive Lock Application
If Passport does not appear and you receive an error message stating, "You must run the WD Drive Unlock application from the WD Drive Unlock CD associated with the drive you want to unlock," you can download and install the updated WD Discovery Desktop application to fix the issue.
Conclusion
In this article, we discussed how to fix WD Passport not showing up on Mac. You can resolve the issue using the solutions mentioned above. However, if you have any questions or additional tips for resolving this issue, feel free to reach out to us in the comments.


